Use some scrap pieces of the hardwood to practice making the curve. There will be a learning curve, so expect a few mistakes.
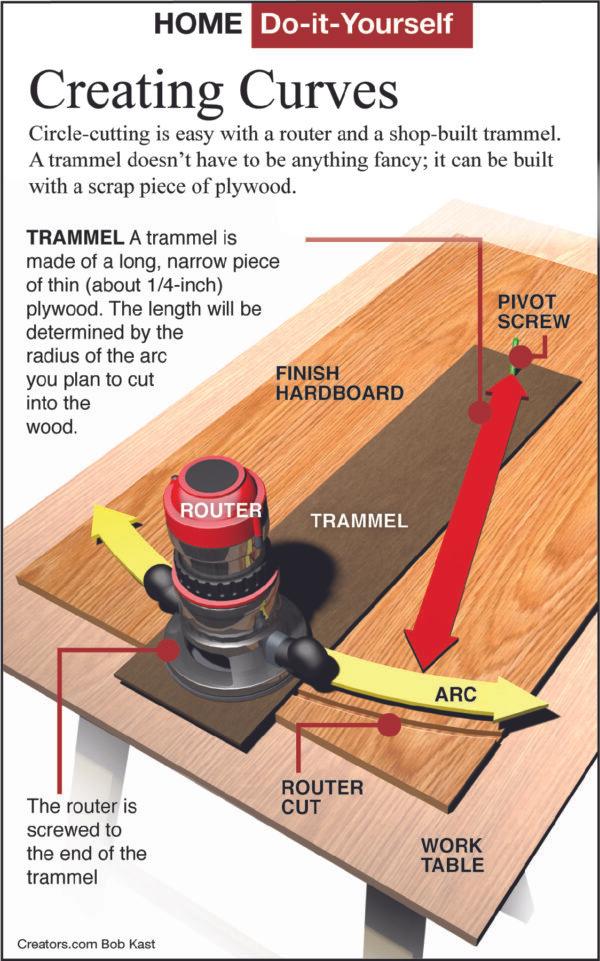
It’s best to make it a perfect circular arc, if possible, when creating curved wood sections for flooring. This allows you to make and use a trammel jig to easily cut the arcs from one large piece of hardwood so all the pieces will fit tightly together. A router is mounted on the end of the trammel to cut the perfect arc through the wood.
To make a trammel, use a long, narrow piece of thin (about one-quarter inch) plywood. The length will be determined by the radius of the arc you plan to cut into the wood. Drill a hole large enough for the router bit to pass through in one end. Screw the router to the end of the trammel.
Use an old piece of plywood for a worktable because the router bit will cut through the piece of hardwood and slightly into the table. Drill a pivot hole in the other end of the trammel at the proper distance from the router bit for the radius of the curve you want. Run a screw through the hole and into the table to create the pivot for the router.
Using a jigsaw, cut the large piece of hardwood into the approximate shape you will need. Make your first circular cut with the router on the trammel. Remove the screw. To cut the other side of the arc, drill another hole in the trammel for the pivot screw at the proper length and screw it to the table. Make the next router cut to complete one piece. Continue this for as many matching curved pieces as the project requires.
There are several options for creating curved edges or inlaid decorative strips. Many professionals use a steam method to bend the trim strips without breaking them. This works well, but it is difficult to do for a single in-home project.
A better way to do this is to use thin wood laminations to create the wider trim strips that you need. Thin strips of wood that are only about one-eighth inch thick are easy to bend without steam. When you cut the wood into the thin strips with a table saw, make sure to lightly mark the center point first. This will allow you to properly align the strips together so the grain looks uniform across the laminations.
Clamp a piece of the curved flooring wood to the worktable. Put wood glue (Gorilla Glue works best) on one side of each lamination strip. Bend them around the curved flooring piece. They will try to spring straight, so nail several small blocks into the worktable around the strips. Drive tapered wooden wedges in between the blocks and the strips to hold them in the curved position.


