This copy is for your personal, non-commercial use only. Distribution and use of this material are governed by our Subscriber Agreement and by copyright law. For non-personal use or to order multiple copies, please contact The Epoch Times Reprints.
Plank Science: 6 Plank Exercises to Build Core Strength
Planks are great for strengthening your core, including the deep muscles of your trunk. These six plank variations can elevate your core to new heights.
Nobody knows exactly when the plank exercise—also known as the front hold or front bridge—was first discovered. Many sources cite Joseph Pilates (yes, that Pilates) as introducing it in the 1920s, but I am quite skeptical. I would say that he very well may have mentioned it or brought it to light in the 1920s, but I feel that the plank, like the squat, push-up, sit-up, and many other basic bodyweight exercises, probably harks back thousands of years.
The physiology and biomechanics aren’t difficult to decipher for anyone in an adventurous exercise mood. It’s very hard for me to believe that ancient cultures that relied on the direct physical prowess of their soldiers to maintain their position in the world didn’t have an entire series of serious, routine exercises on hand to maintain that strength and power alongside their regular training. I do feel, however, that Mr. Pilates gets credit for popularizing the movement in the modern era—well, about 100 years ago now.
Whoever it was in the distant past who first performed the movement discovered an amazingly powerful exercise.
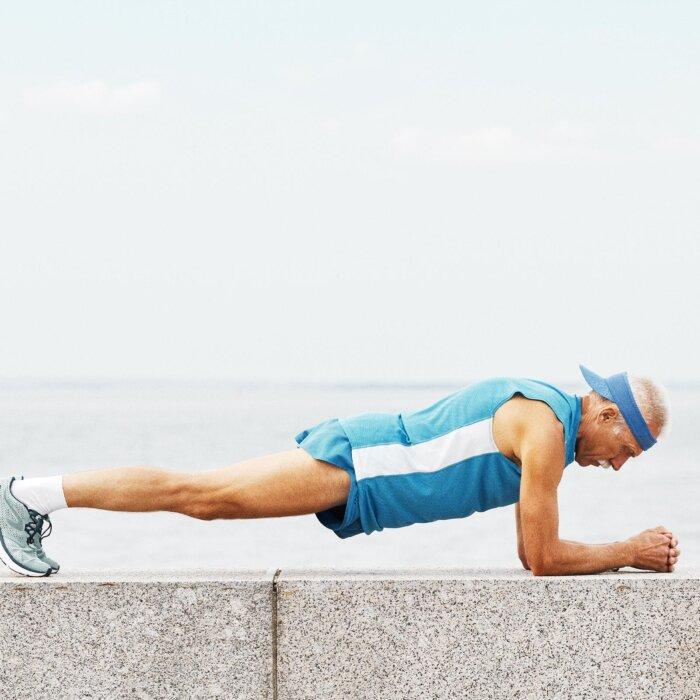
In essence, the basic plank exercise involves holding your body off the ground either on your hands—as in the high part of a push-up—or on your forearms, with your trunk and legs as straight as possible. Straight as a plank, in other words.
Planks aren’t just about moving into a position, though. The real trick is holding your muscles in constant tension during whatever plank you’re performing to ensure the maximal benefit for those muscles.
Classic Plank and 5 Variations
The following six plank exercises build your core strength and endurance. I recommend starting with 30-second holds, if you can, at first, followed by 1-minute holds for those in the intermediate phase. For advanced folks, I suggest holding for up to 90 seconds, though that can be considerably challenging.
I also suggest discussing these exercises with your medical provider first to ensure that they are right for you.
1. Classic Plank
First up is the classic plank, because it’s the one that started it all. The original classic is almost always the best, or at least possesses the qualities that made it stand out enough to be timeless, and that’s true here in my opinion. This “frozen push-up” works your entire abdominal muscle set, your shoulder and chest muscles, and the muscles along your back. It’s a tough one, especially at first, but I think you’ll master it well with time and consistency.
Step 1: Enter a push-up position on your toes and hands, with your elbows straight and your hands directly below your shoulders. Keep your knees straight. Your entire body should be in a straight line from your shoulders to your feet.
Step 2: Try to hold this position for at least 30 seconds. Be sure not to let your back arch, keep your chest muscles engaged, and avoid sagging down on your shoulders.
Step 3: Moving into the plank and holding it as long as you comfortably can counts as one set. Try to perform three sets.
Modifications: If you need to, perform this exercise with your knees lightly touching the ground to reduce strain on your body. Note that this position can be challenging for some wrists and shoulders.
Why I Like Them: The classic plank is wonderful and works on a plethora of your core muscles. It improves so many different areas that it can make you feel fit and young.
The Forearm Plank works on all the abdominal muscles: the rectus abdominis—the “six pack”—the transverse abdominis, and the obliques as well. It also works your shoulder and chest muscles, especially the pectoral and deltoid muscles, the serratus anterior muscles, which help stabilize the scapulae against “winging,” and the erector spinae, the muscles that run all the way down both sides of your spine and help keep your back straight.
The Forearm Plank also has you covered when it comes to your gluteal and leg quadriceps muscles. It’s a good alternative to the classic plank’s straight-arm position—or, if you can do both, a great complement.
Step 1: Lie face down on a firm, supportive surface, with your forearms straight ahead, elbows under your shoulders and palms down.
Step 2: Tuck your toes under and engage your core to raise your hips off the floor until your entire body is in a straight line from your shoulders to your feet.
Step 3: Hold this position for 30 to 90 seconds (or as long as you can).
Step 4: Holding the position for as long as you can counts as one set. Try to perform three total sets.
Modifications: Lightly touch your knees down—the same option as in the Classic Plank—if it’s too hard to hold the position on your forearms alone. Be sure to keep your core musculature firmly engaged the entire time you perform this activity. Though it requires core engagement to enter and maintain the movement, I want you to engage even more.
Why I Like Them: Forearm Planks build full-body strength, improve posture, and support your back. With no equipment required and just a few minutes, it works multiple muscle groups at once.
3. Bear Plank
The Bear Plank numbers among my go-to exercises. My exercise group used to do group bear crawls and Spiderman crawls across the functional training area of our gym. What I quickly discovered was that if I moved into position for the bear crawl but then had to wait until everyone else got sorted out before we could start the movements, I would tire out quickly as I held the position.
In short, I was getting a heck of a workout before I was even moving. The Bear Plank works many of the same muscles that the regular plank addresses, but I find that it takes strain off your lower back while placing increased exertion on your ankles and feet.
Step 1: Move into a tabletop position on your hands and knees, with your toes tucked.
Step 2: With your core engaged, float your knees about an inch off the floor and hold the position for as long as you can.
Step 3: Each hold counts as one set. Try to perform three sets.
Modifications: You can place your knees down as needed if you struggle with this hold, but only just long enough to recover, because doing so releases many muscles out of contraction. Once you rest a little, float your knees again and bring all of your muscles back into contraction.
Why I Like Them: Bear Planks ease the feeling of stress in my back, and should do the same for you. It shifts some of the work from your back and midsection onto your legs, so this is a good one if you struggle with lower back discomfort during the regular plank.
4. Kneeling Side Plank
The full side plank is a doozy—highly effective for the abs. It adds a tremendous focus on your quadratus lumborum muscles, which chiefly run between the top of your ilium—the big “wings” you can feel in the pelvis bones—and the lateral “spines” of your upper four lumbar vertebrae. However, full side planks can be tough for some people. So we’re going to perform a bent-knee version that should work for more people, while still being a strong workout.
Step 1: Lie on your side on a firm, supportive surface, resting on your forearm. Bend your knees to 90 degrees.
Step 2: Gently firm your muscles and raise your hips off the floor until your body is in a straight line from your hips to your shoulders. Then push your hips forward a bit to eliminate hip flexion. In essence, you want your hips in a neutral position from side to side and front to back.
Step 3: Lift your upper arm straight up toward the ceiling. Hold this position for as long as you comfortably can before easing back down to the floor.
Step 4: With each hold counting as one set, perform three sets on each side.
Modifications: You can allow a little bit of hip flexion if that keeps your lower back more comfortable, but in general I suggest keeping your hips in a neutral position as much as possible. You can place a pillow under your hips to decrease how far you have to lift off the floor during this activity, which can make it easier to perform.
Why I Like Them: The Kneeling Side Plank engages your lateral musculature directly, because these muscles can often be neglected. Strong lateral muscles make everyday movement feel easy by providing a total front-to-back and side-to-side strength profile.
5. Lateral Crossover Plank
While we’re focusing on lateral movements while on our sides, I have another great movement for you to try. The crossover plank starts like a side plank, but then moves the upper foot out in front and flat on the floor, where it adds a gentle push. This position is great for easing tension in your piriformis muscles, and due to that simple fact alone, some of you will absolutely love it.
Step 1: Assume a high plank position, with your elbows and knees straight, your legs together, and your trunk in a straight line.
Step 2: Holding your hands in place, rotate your trunk to the right as you move your upper foot out in front of you and place it flat on the floor with your toes pointing away from you. Try to place your foot so that you get maximal flexion of the right hip.
Step 3: Lift your right hand off the floor and place it on your hip while turning your head and pointing your nose toward the ceiling. Finally, push into the floor with your right foot while you reach toward the ceiling with your right hand.
Step 4: Hold position for approximately 15 seconds, or as long as you comfortably can. Repeat the movement on the other side.
Step 5: Moving into position, holding for as long as you comfortably can, and then lowering back down to the starting position counts as one set. Try to perform three sets per side.
Modifications: If you find it too difficult to rise into a full lateral plank, try to perform it from the kneeling side plank instead, which, as a side benefit, may also magnify the piriformis stretch.
Why I Like Them: This crossover version of the Side Plank works the lateral musculature such as the quadratus lumborum, and adds a fantastic stretch for your piriformis muscles at the same time.
6. Bird-Dog Plank
The bird-dog plank is exactly what it sounds like. It starts like the regular plank and challenges your body asymmetrically in the same manner as the bird-dog exercise. Now, this would seem to make the exercise harder, but I find that the difficulty doesn’t increase terribly, while the benefits do. By adding asymmetrical resistance, you push your muscles to not only hold the plank position, but also resist rotational movement in your trunk and hips.
Step 1: Move into a Classic Plank position. Once stabilized, lift your left arm and right leg off the floor and slowly extend them straight out horizontally. Once you extend them all the way, return to the plank and repeat the movement with your right arm and left leg.
Step 2: Moving your arm and leg out straight counts as one repetition. Try to perform three sets of 15 repetitions per side.
Modifications: Feel free to modify the sets and repetitions to suit your needs. The Classic Plank is challenging, and the bird-dog movement doesn’t make it any easier, so you may not be able to perform them for long. You can also alternate with just one arm and then one leg, rather than both at the same time.
Why I Like Them: Superimposing the bird-dog movement onto a basic plank focuses excellent muscle work on the multifidus and rotatores muscles—small muscles that run along the spine and contribute to trunk rotation.
Planking movements are awesome—truly effective at working many muscles at the same time—and especially wonderful for maximizing the strength and efficacy of your core musculature. Because your core musculature functions somewhat like the foundation of a house, upon which everything else rests, the better tuned it is, the better your overall quality of life.
I suggest performing these exercises at least three times per week, and ideally, five times per week. Don’t be disheartened if you can’t do much at first; start wherever you are and then work up from there—you’ll quickly find the right muscles and grow stronger. Good luck, and I hope these exercises work well for you.
About the Fitness Model: Aerowenn Hunter is a health editor for The Epoch Times. She’s an accredited yoga therapist with more than three decades of teaching experience.
Views expressed in this article are the opinions of the author and do not necessarily reflect the views of The Epoch Times. Epoch Health welcomes professional discussion and friendly debate. To submit an opinion piece, please follow these guidelines and submit through our form here.
Kevin Shelley
Kevin Shelley is a licensed occupational therapist with over 30 years of experience in major healthcare settings. He is a health columnist for The Epoch Times.