)")
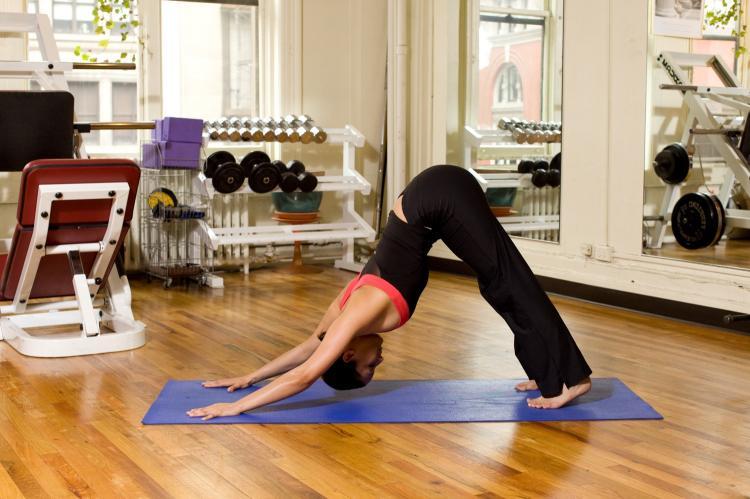
The downward facing dog is one of the most widely used postures in hatha yoga. It is great for opening the backs of the legs, warming up the body, and lengthening the spine. Due to tightness, there are many modifications created for the downward facing dog, but when executed in its traditional form, it looks like and upside down V, with both hands and feet on the floor, and the arch in the lower back maintained.
Begin kneeling on all fours. Keep the heels of your hands underneath your shoulders so that your arms are perpendicular to the floor and in line with your shoulders. The fingers point forward. Spread your fingers out, like starfish, on the floor and make sure your weight is equally distributed on your hands. Externally rotate your arms so the inside of your elbow points toward the front of the room. Keep your thighs in line with your hip sockets and perpendicular to the ground.
Arch your lower back, reaching your tailbone toward the sky. Tuck your toes under and shift your body weight to your feet as you reach your sitting bones to the ceiling. Keeping your knees bent, extend the sides of your waist long while pressing away from the floor.
Shrug your shoulders to your ears and then release them by dropping the weight of your head toward the floor. Now your shoulders should be lying flat across your back and your collarbones are extended long and broad. In Anusara yoga, they describe this action as:
Step one: bring the base of our shoulder blades to the back of your heart center.
Step two: bring the tops of your shoulder blades out to the sides.
Step three: expand your collarbones out to the sides.
You may slowly begin to extend your knees, but only if you can do so without tucking your pelvis under or rounding your back. If you extend your knees before you are ready to, you may find that the tight spot that is ultimately preventing you from keeping good form in the full expression of the pose will remain tight and you will end up with physical compensations. These compensations can potentially lead to injury, chronic pain, or a distorted posture. By working on the stretch in proper alignment you will be able to open your tight spots layer by layer, bringing you closer to your flexibility goals. Working this way will ensure that you get the most out of your practice.
Stay in the posture for at least five deep breaths. Keep the breath long and controlled. Play with breathing in to the sides of your waist. You may notice, as you do this, that your ribcage begins to expand out with each inhalation and contracts each exhalation.
Another image you can toy around with is reaching your sitting bones up, toward the ceiling. You may notice with each exhalation that the legs slowly start to extend longer. You may also notice that your abdominal muscles begin to gently contract and help further support your body.