No-Bake Tiramisu Cheesecake Is as Good (And Easy) as It Sounds

No-Bake Tiramisu Cheesecake Is as Good (And Easy) as It Sounds
The layer of coffee-soaked ladyfingers is a lovely surprise inside the center of the cake. (Joe Lingeman/TNS)
7/25/2021
Updated:
7/25/2021

If there was ever a match made in delicious-sweets heaven, it is the union of tiramisu and no-bake cheesecake. Tiramisu’s flavors (espresso, chocolate, mascarpone) play so well with rich and creamy cheesecake that it can only be said they were made for each other. Plus, is there anything more fun than a ladyfinger crust?

To make said crust, you‘ll mix crushed ladyfingers and melted butter with just a touch of cocoa and espresso powders, then press the mixture into a springform pan. As it freezes, you’ll whip up the super-simple filling, which is heavy on the mascarpone and flavored with espresso powder and coffee-flavored liqueur. Tiramisu is traditionally made with marsala wine, but a coffee liqueur like Kahlua is not only both slightly sweet and espresso-flavored, but also flavored with rum, which is wonderful with both mascarpone and chocolate.

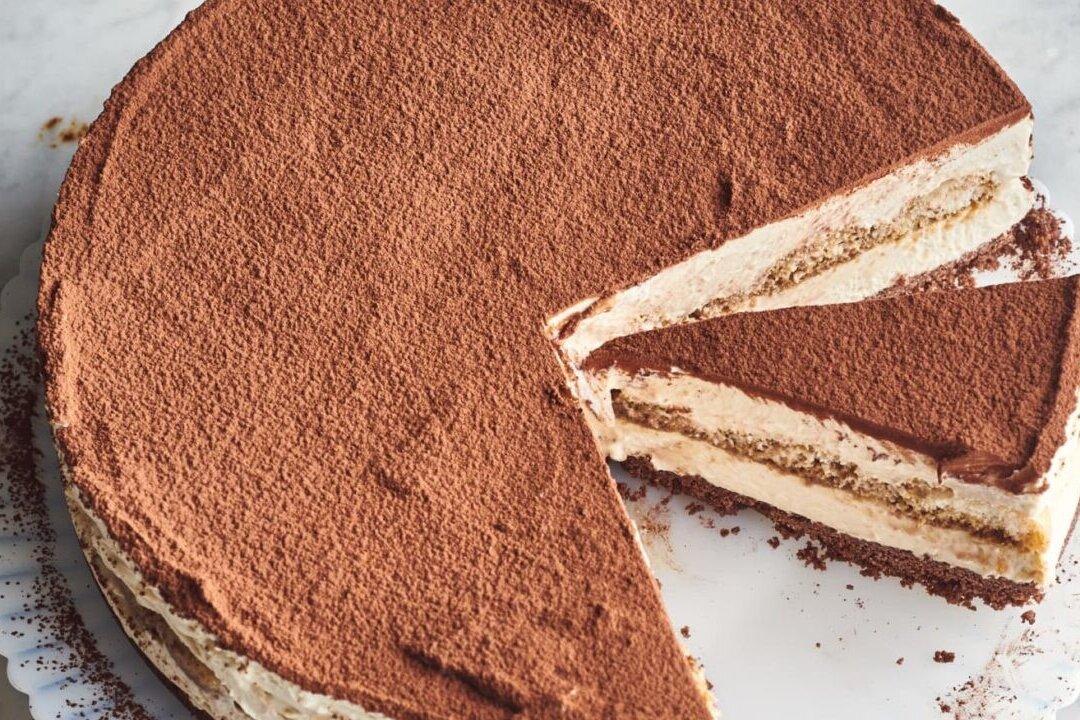
After spreading half the filling over the crust, you'll soak ladyfingers in a mixture of coffee and more Kahlua and tightly layer them over the filling. Top with more filling and voila! Your part is done.

Place the cake in the fridge to chill, then generously dust with cocoa powder before serving. When sliced, the layer of coffee-soaked ladyfingers is a lovely (and pretty!) surprise in the center of the cake, and ensures each bite is packed with tiramisu flavor.

No-Bake Tiramisu Cheesecake

Serves 16
For the Crust
  • 1 stick (8 tablespoons) unsalted butter
  • 7 ounces crisp ladyfingers (about 24)
  • 1 tablespoon Dutch-process cocoa powder
  • 1 teaspoon espresso powder
For the Filling
  • 16 ounces mascarpone cheese
  • 8 ounces cream cheese
  • 3/4 cup powdered sugar
  • 1/2 teaspoon espresso powder
  • 1/4 teaspoon kosher salt
  • 1 1/2 cups cold heavy cream
  • 1/4 cup coffee-flavored liqueur, such as Kahlua
  • 1 teaspoon vanilla extract
For the Soaked Ladyfingers
  • 3/4 cup boiling water
  • 1 tablespoon espresso powder
  • 1/4 cup coffee-flavored liqueur, such as Kahlua
  • About 4 ounces crisp ladyfingers (about 14)
  • Dutch-process cocoa powder, for dusting
Prep the Filling

Place the mascarpone cheese and cream cheese for the filling in the bowl of a stand mixer. (Alternatively, place in a large bowl if using an electric hand mixer.) Let sit at room temperature until softened, about 1 hour.

Make the Crust

Melt the unsalted butter in the microwave or on the stovetop.

Break the ladyfingers in half and place in a food processor fitted with the blade attachment. Process until fine crumbs form, about 15 seconds. Add the melted butter, Dutch-process cocoa powder, and espresso powder. Process until a handful of crumbs holds together when squeezed, stopping and scraping down the sides of the bowl halfway through, about 30 seconds total.

Transfer the crumbs to a 9-inch round springform pan. Using your hands or the bottom of a dry measuring cup, press the crumbs firmly and evenly into the bottom of the pan. Freeze while you make the filling.

Make the Filling

Add the powdered sugar, espresso powder, and kosher salt to the bowl of mascarpone and cream cheeses. Beat with the paddle attachment on medium speed until smooth, about 2 minutes.

Add the cold heavy cream, coffee-flavored liqueur, and vanilla extract. Replace the paddle with the whisk attachment and beat on medium-high speed until stiff peaks form, about 5 minutes.

Remove the crust from the freezer. Transfer half the filling (about 2 1/2 cups) onto the crust and spread it into an even layer that reaches all the way to the sides of the pan. Refrigerate the crust and remaining filling while you prepare the ladyfingers.

Make the Soaked Ladyfingers

Place the boiling water and espresso powder in a small bowl and whisk until the powder is dissolved. Add the coffee-flavored liqueur and whisk to combine.

Remove the crust and remaining filling from the refrigerator. Arrange the crisp ladyfingers onto the filling in a single tight layer, breaking them up as needed so that there are no gaps, especially around the edges of the pan.

Working with 1 ladyfinger at a time, remove from the pan. Quickly dip the entire finger in the coffee mixture until just dampened but not soaked, 2 to 3 seconds, then return to its original spot.

Evenly spread the remaining filling over the soaked ladyfingers. Cover the pan in plastic wrap. Refrigerate at least 6 hours or up to overnight.

When ready to serve, unlock and remove the sides of the pan. Generously dust the top of the cake with a thick layer of Dutch-process cocoa powder. Slice and serve with more cocoa powder dusted on top.

Recipe Notes

The cake can be made up to two days in advance. Do not remove from the pan or dust with cocoa powder until ready to serve.

Refrigerate leftovers, lightly covered in plastic wrap, for up to three days.

Jessie Sheehan is a contributor to TheKitchn.com, a nationally known blog for people who love food and home cooking. Submit any comments or questions to [email protected]. Copyright 2021 Apartment Therapy. Distributed by Tribune Content Agency, LLC.
Related Topics