There’s a kind of magic to bread baking. The simplest of ingredients—grain and water—come together to form a stodgy but pliant dough, which, with the help of an invisible-to-us force that we now know to be yeast, rises and bakes into crusty loaves with an airy, delicate crumb.
While some modern nutritionists and wellness influencers might encourage going grain-free or low-carb, bread is so central to humanity’s story that it has woven itself into our myths, folklore, and faiths. To have bread meant having a chance at survival during the hardest of times. It’s the staff of life; even the modern-day Egyptian word for bread, “aish,” means life.
Of course, bread has changed over the millennia. The bread that you find at the grocery store today bears little resemblance to the bread of Ancient Rome and Egypt or even Medieval Europe. Modern bread is typically made with refined flour. During the refining process, many of the grain’s natural complement of nutrients, especially B vitamins and minerals, are lost. To make up for this loss, manufacturers fortify white flour by adding some of those nutrients back, but the modern process hardly gets it right. The nutritional value of enriched bread bears little resemblance to the complement of vitamins, minerals, and other micronutrients found in traditional loaves made from natural flours.
It’s not just the flour that’s different; it’s also the yeast. Instant yeast and baker’s yeast give modern bread its rise. Baker’s yeast was first isolated and sold in the mid-19th century, although it didn’t become popular until the turn of the century, and it’s now so ubiquitous that older techniques have been nearly abandoned.
Before modern yeast, bakers used starter cultures rich in wild yeast. This includes both sourdough starter and barm. Sourdough starter is a slurry of water and flour that’s rich in both wild yeast and lactic acid-producing bacteria. While yeast gives the bread its rise, the bacteria give it a distinct sour flavor. By contrast, barm is yeast leftover from beer-brewing, and it was often the leavening of choice throughout most of history.
Capture Your Own
To take advantage of these benefits and to enjoy the pleasure of baking the old-fashioned way, you’ll want to start by capturing your own source of wild yeast. A sourdough starter is a popular method, but it often takes vigilant care and daily feeding. An alternative is yeast water.While you’ll find similar methods of capturing wild yeast in Victorian-era home manuals, yeast water is a Japanese artisan baking technique developed by Taro Hashiguchi for his Kyoto bakery, Taro-ya. The technique was brought to the Pacific Northwest by pastry chef Junko Mine, and it’s quickly finding a treasured place among home bakers for its ease and novelty.
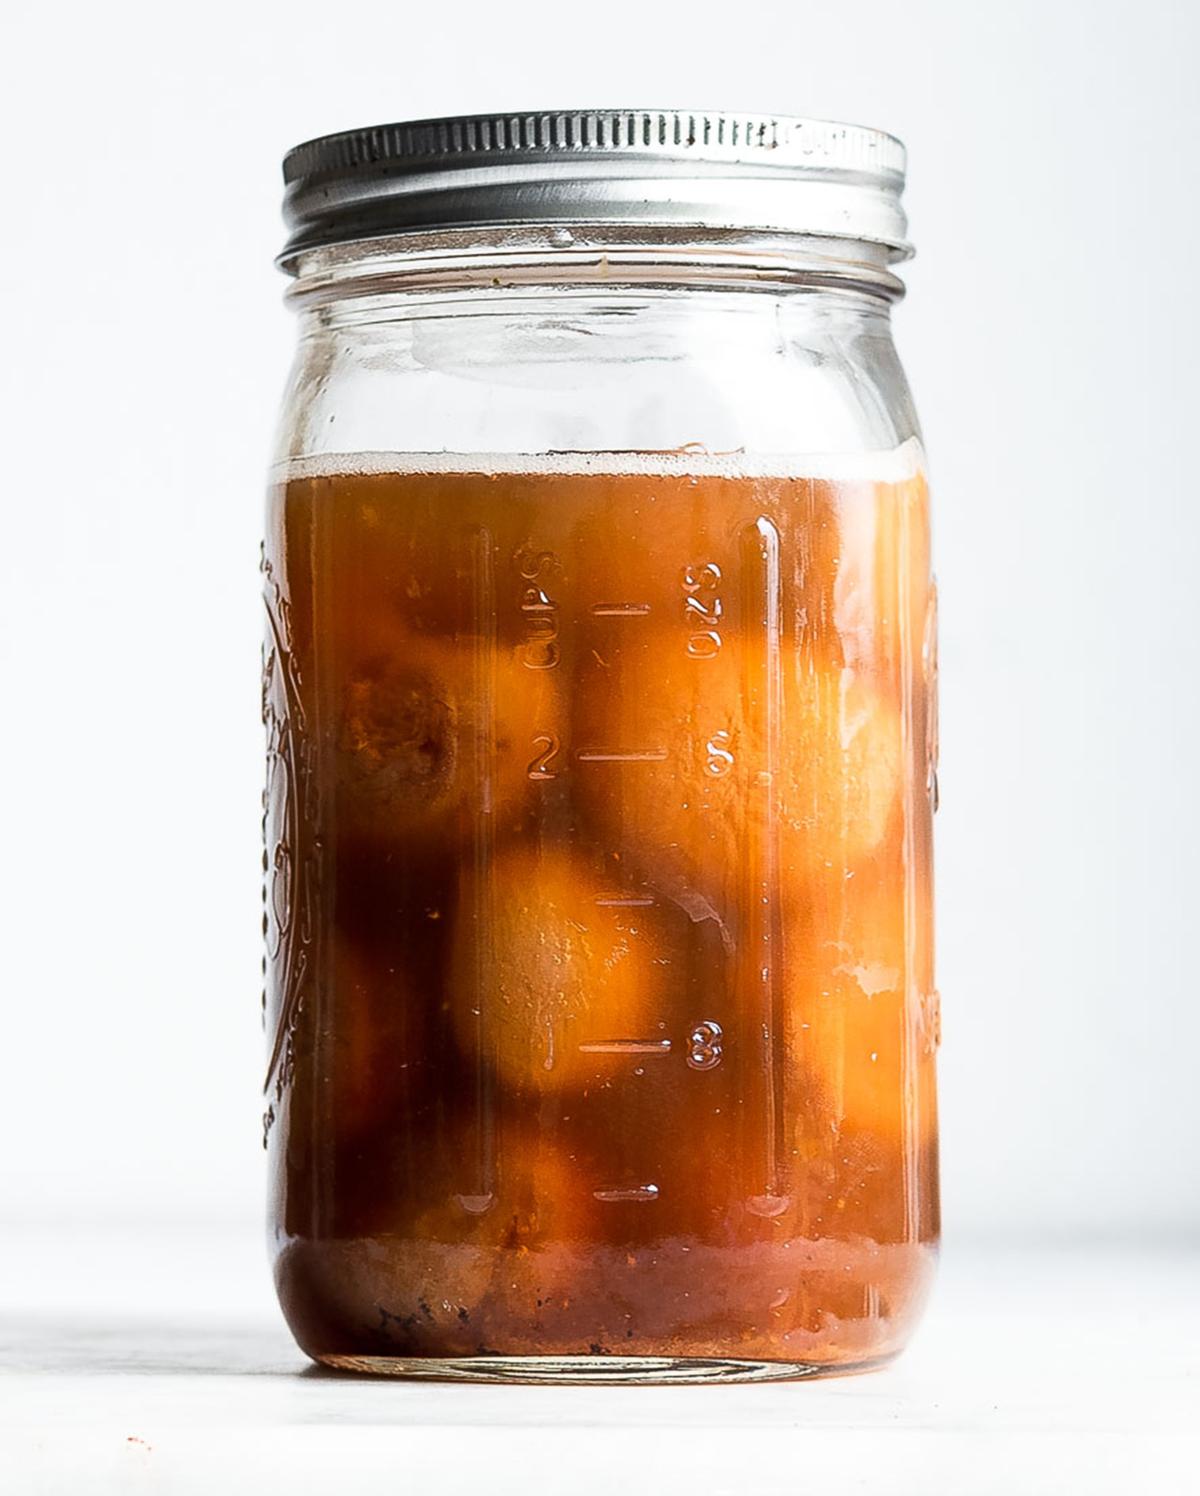
To make yeast water, simply drop fruit (dried fruit seems to work best) into a jar, fill it with water, and wait. Within about five days, the liquid will turn cloudy and will fizz and foam. That’s the yeast at work. Strain the water, and use it as the liquid portion of your bread recipe; you won’t need baker’s yeast. It may be a little slower to rise and less predictable than a packet of baker’s yeast, but it’s a fun kitchen project that makes delightful bread, and it’s closer to the real thing than just about anything you can buy at the store.
Wild Yeast Water Starter
Making a wild yeast starter can seem a little daunting, but it’s one of the easiest kitchen projects that you can undertake. There’s only a single step: sealing fruit into a jar filled with water. Then, you wait. In less than a week, you’ll have water full of active yeast—a starter in liquid form—that you can use to bake bread.Fruits, vegetables, and even wild herbs are all sources of wild yeast, but dried fruit is one of the easiest for newcomers to use. Figs, apricots, and raisins work well.
- 1 cup tightly packed dried fruit, unsulfured
- Warm water
Wild Yeast Bread
Wild yeast bread is beautiful and unruly all at once. Instead of using a sourdough starter or commercial baker’s yeast, fizzy and bubbly yeast water leavens this bread, resulting in an artisan-style boule that’s delicious, if a bit unpredictable. Remember, you'll need to plan about 5 days in advance to make the yeast water for this bread; then, note that the dough will need a total of 7 to 8 hours of resting and rising time before baking.- 300 grams bread flour
- 200 grams whole-wheat flour
- 300 grams wild yeast water
- 2 teaspoons fine sea salt
- 2 tablespoons water
Pour the wild yeast water into the bowl, and stir it together with flour to form a loose, shaggy dough. Cover the bowl tightly with a lid or a stretch of plastic wrap. Allow the dough to rest for about 30 minutes.
Sprinkle the salt over the dough and drizzle it with the 2 tablespoons of water. Knead the salt and added water into the dough. Cover the bowl once more.
Let the dough rise for about 1 hour, then lift the lid and stretch the dough over itself. Repeat this process every 30 minutes for the next 2 hours. Then, let the dough rest undisturbed for approximately another 2 hours, until it has doubled in volume.
Dust your working surface with flour, then tip the dough out of its bowl onto the floured surface. Gently press it down into a loose rectangular shape. Fold the corners in over themselves, then shape the dough into a boule.
Transfer the dough to a well-floured banneton, cover it loosely with a tea towel, and let it rise for another 2 hours. Then, gently press a fingertip into the dough. If it bounces back, let it continue to rise. If the pressure of your fingertip leaves a dent in the dough, transfer it to the fridge.
While the dough rests in the fridge, place a Dutch oven into the oven and set the temperature to 500 degrees F.
When the oven reaches temperature, cut a square of parchment paper about 12 inches by 12 inches.
Turn the dough out of the banneton onto the parchment paper, then score the dough using a bread lame or a sharp kitchen knife.
Remove the Dutch oven from the oven and carefully remove the lid. Holding the edges of the parchment paper, gently lower the dough into the Dutch oven. Return the lid to the pot, and transfer it back to the oven.
Turn down the oven’s heat to 450 degrees F, and bake for 30 minutes.
After 30 minutes, remove the lid of the Dutch oven and continue baking the bread for another 15 to 20 minutes or until golden brown. Transfer it to a cooling rack, and let the bread cool completely before slicing and serving.