The nonna way is to decide on how many eggs you are going to use, and use one handful of flour for every egg. This handful equates to 3 1/2 ounces of flour per egg.
Step 1: Weigh Out Your Ingredients
Allow 3 1/2 ounces 00 flour (or plain/all-purpose flour) per person for a main course-sized portion. You need 2 ounces egg without its shell for every 3 1/2 ounces flour.For example, if you are making pasta for four people, you will need 14 ounces (3 1/3 cups) flour and 7 3/4 ounces egg, which most of the time will mean four hen eggs. But weighing out your ingredients means you can also use other eggs, such as duck or turkey, which is something the nonne do—Velia regularly uses turkey eggs, as that is what she has running around her backyard.
If your eggs are on the small side, add a bit of water or another egg yolk to bring the quantity up to the right weight. If your weight is slightly over, use the eggshell to scoop out excess egg white.
Step 2: Mix Them Together
Tip the flour onto your board in a heap. Use your fingers to make a well in the center, making sure it’s not too wide or the rim too low, otherwise your egg mix will overflow.Pour the eggs into the well. Take a fork (or use your fingers) and scramble the eggs together. They are mixed sufficiently when you lift the fork and you have a homogeneous, non-clumpy looking liquid that falls smoothly from your fork.
Draw your fork round the inside of the flour wall, so a small quantity of flour falls into the egg mixture. Whisk it in, smooshing any lumps, so you gradually create a batter. Repeat until you have a mixture that won’t run all over the board. At this point, you can cave in the flour walls and mix in the rest of the flour with a bench scraper by scraping the flour inwards and over the batter. Of course, you can beat the egg and flour together in a bowl, even with a food mixer, but it’s not as fun.
Mop up any flour with your dough and give it a quick knead. If it is sticky, add a tablespoon of flour and knead it in. It is better to adjust your dough now than later.
If it is not sticky and you have some flour on the board, scrape off the excess, so you have a nice clean board to knead your dough. Nonne sieve any excess flour and reuse it.
The dough should feel soft and pillowy, but not too sticky.
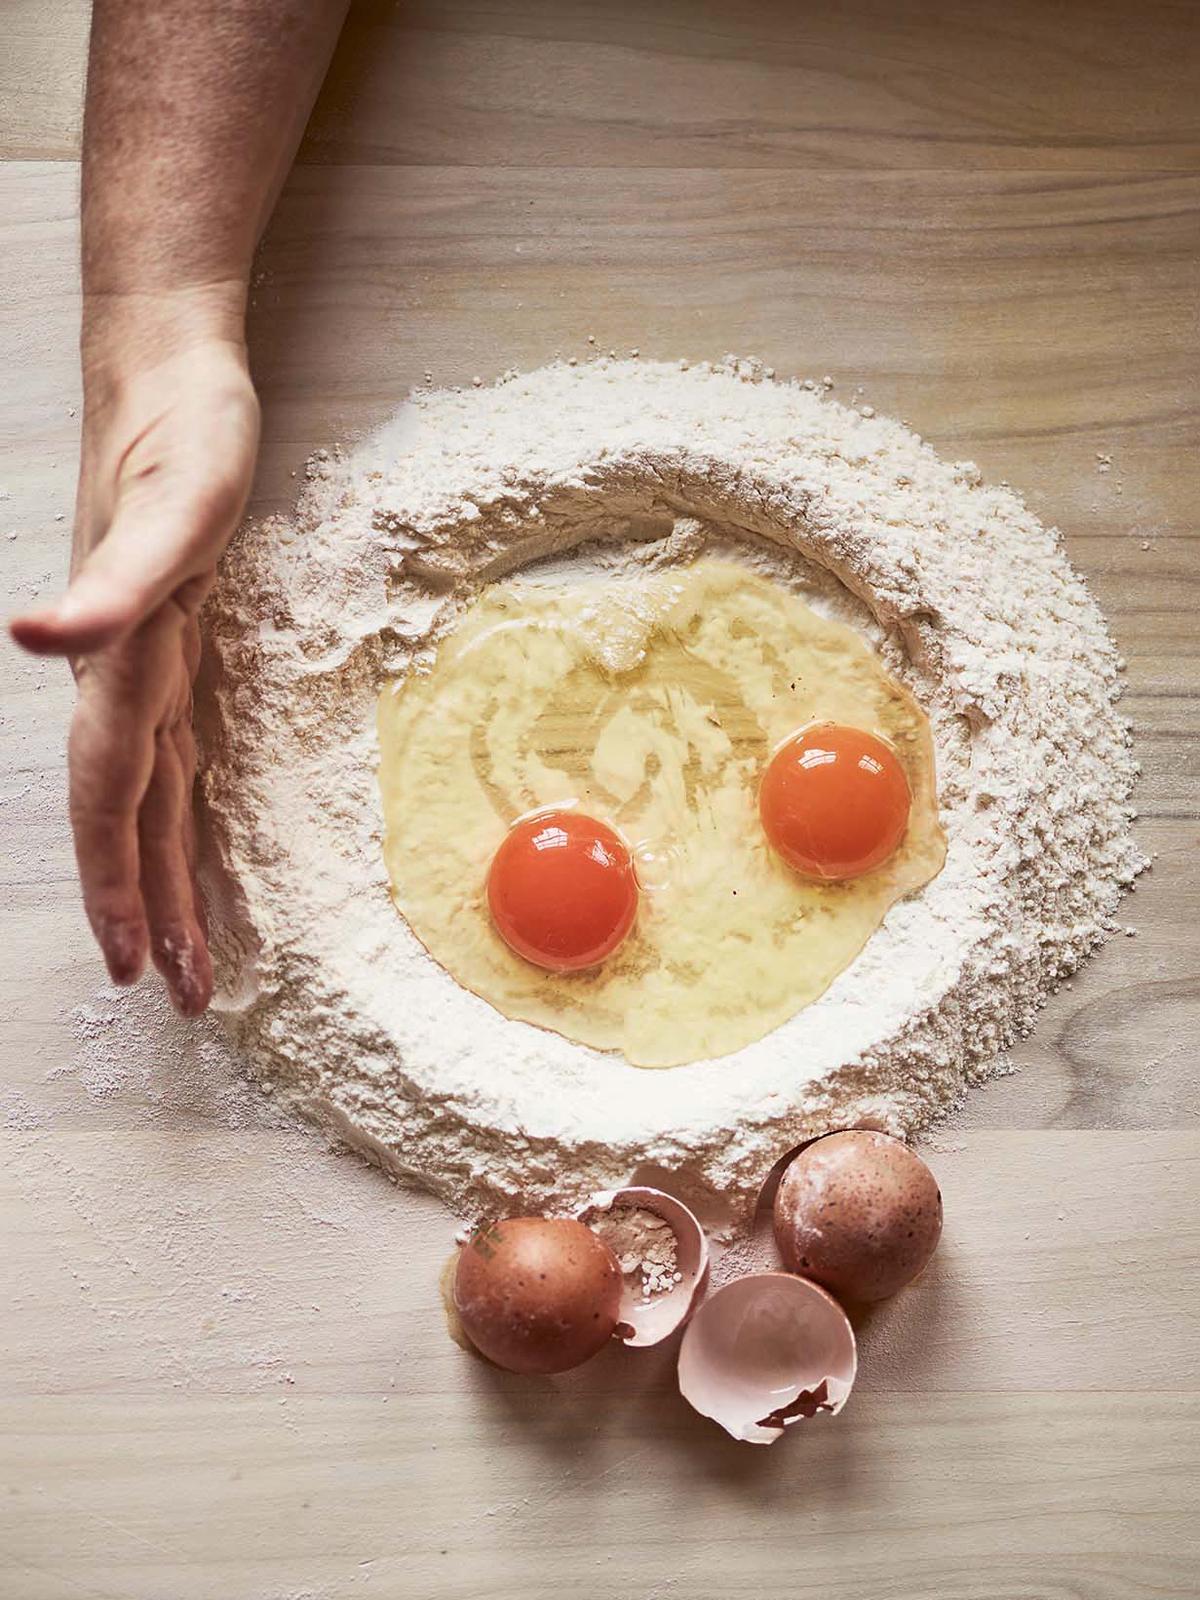
Eggs and flour. Emma Lee
Step 3: Knead the Dough
Knead the dough for 10 minutes minimum. Think of your hands as waves: the heels of your hands push the dough away from you, while your fingers pull it back. Once your dough has become a log, turn it 90 degrees and fold it half and continue kneading. You want to work at a brisk pace, as air is the enemy of decent pasta—it will dry it out, so don’t dawdle. If the pasta feels too dry, damp your hands with water to put moisture back into the dough.Kneading develops the gluten and elasticity of the dough. Your dough should feel silky and smooth. When you press your thumb into the dough, it should bounce back. Some nonne judge their dough to be done when they can see small holes in the dough if sliced through the middle. To knead, you can also use a dough hook on your food mixer.
Step 4: Leave the Dough to Rest
At this point, place the dough in a lidded bowl and cover it to stop it from drying out. Cling film (plastic wrap) is good too, but you may not want to use it. You can also use a tea towel, but it’s important it hasn’t been washed with perfumed detergent as this will add an odor to your pasta. Leave the dough at room temperature for 30 minutes. This relaxes the gluten and makes it easier to roll out.You can also leave it in the fridge overnight. The color will darken, but it will taste the same. It’s important to bring the pasta back to room temperature before you try rolling it.
Step 5: Roll Out the Dough
Nonne all have their own technique for rolling out. Some smooth out the dough over their pin with a dowager breaststroke in varying degrees of stateliness; others approach it with all the intensity of a curling team scrubbing ice in front of their stone. Whatever the sporting analogy, it’s most definitely an upper arm workout. Those in Emilia Romagna pride themselves in being able to roll a perfect circle. This isn’t necessary but it looks gorgeous.Julia Ficara, who runs handmade pasta classes in Rome at her cookery school Grano e Farina, recommends the following technique because it’s efficient and back-friendly. This is wordy—but watching the Pasta Grannies “How to Roll Pasta” video on YouTube will help bring this explanation to life.
Before you start, remember to keep your pasta floured throughout the process.
Cup your hands over your rolling pin so your wrists nearly touch the pasta board. Flatten your dough with your pin, turning it a few degrees at a time in the same direction; this helps to keep it circular.
When it is the size of a plate, start with your hands at hip width and roll the top third of your dough (furthest away from you) by following the curve of the circle and drawing your hands inwards as you push the pin away from you. Your hands will meet in the middle. Stop the pin before it reaches the very edge. Roll the dough four times.
Turn the pasta from 12 to one and repeat going round the clock.
You will end up with a bump of pasta in the middle. To get rid of it, flip the outer edge of pasta over the pin. Hold the pasta with one hand, and place the other hand on the dough to stop it moving. Give the pin a tug with the pasta hand to create a snug fit around the pin. Roll the dough over the pin towards you.
Move your hands wider, stick your elbows out and, pressing down, roll the pasta out two or three times. This will flatten the thicker central zone of your pasta. Finish with the pasta rolled up and turn it 90 degrees, opening it out across the board.
Repeat this process until the sfoglia is too large to move comfortably by hand. At this stage, you will need to roll it up around the pin and turn it, as described above. Allow your pin to roll on its own across the dough to remove any air after you have turned it.
You can let your sfoglia drape over the edge of the board—allow about a third, no more, otherwise the whole thing will slip off. This helps to anchor and stretch it, but also it means you don’t have to stretch too far over the board, messing up your back. Remember not to lean against the pasta.
Do not attempt to roll the entire sheet (until you feel expert) or change rolling direction; just keep rolling the outer third directly in front of you. As the dough gets bigger, your arms and elbows start quite far apart. Eventually, you will end up with pasta you can see through. It should feel like heavy linen.
To check your pasta is evenly rolled, roll up a third, hold onto the edges (it will fall off the pin otherwise) and hold it up to the light. Darker patches mean thicker dough and you haven’t rolled it uniformly, so you will want to go back over these areas.
Leave your pasta sheet to dry on the board for 5 minutes. For tagliolini, tagliatelle, and pappardelle, you can now flour it, roll it up very gently (like a carpet) into a log, and it’s ready for cutting.
Excerpted with permission from “Pasta Grannies“ by Vicky Bennison, published by Hardie Grant Books, October 2019.