Did you know that there are more than 7,000 different varieties of apples in the world? Some are sweet and crisp, others tart and tangy; some soft and juicy, others dense and mild.
Each fall, once the temperatures plummet and the leaves begin to drop, my family and I go to one of our nearby orchards and come home with bags of apples to cook, bake, and can—and simply snack on—throughout October. Some of our favorite recipes include caramel apple Dutch babies, apple butters, cranberry-apple jam, canned apple pie filling, apple crisp, applesauce, and apple jelly.
One year, we pressed a couple of boxes of apples into fresh apple juice. I tell you, there is not much that can compare to a glass of freshly squeezed apple juice—it’s so incredibly delicious. The leftover mashed apple, the apple pomace, can be fermented into an effervescent, thirst-quenching beverage, or even be made into hard cider or apple cider vinegar.
Regardless of which variety of apples we have, I always make a few trays of dehydrated apple chips. My daughter gobbles them up in less time than it takes to make them. The concentrated apple flavor is hard to pass up, and the aroma that fills the house while the slices are drying is an additional perk. They are a great on-the-go snack and are a special fall treat—and they also happen to be the first step in making our favorite infused liquor, apple pie whiskey.
Today, I’m sharing three of our beloved recipes for preserving apples: a fall-spiced apple butter, fermented apple chutney, and that apple pie whiskey.
Fall-spiced apple butter is perfect for spreading over toast, pancakes, or waffles, but it’s also delicious brushed over grilled or roasted proteins. It’s fantastic stirred into yogurt and oatmeal, and great baked into treat bars. I’ve included instructions for water bath canning, but if you are not a fan of the process, you can skip the boiling pot and check my instructions for refrigerating the apple butter instead.
Fermented apple chutney is ridiculously quick to prepare. Because of the naturally occurring high sugar content, this ferment will be ready in just a couple of days. This chutney can be used any of the ways you’d typically use chutney, such as paired with curries, jerked proteins, or mixed into plain rice. Chutney is also a good way to elevate a sandwich when used as a spread, or dollop some over soft cheese and serve with crackers to create a unique appetizer.
Infused apple pie whiskey is so good, it’s almost dangerous. It’s the perfect after-dinner dessert for your upcoming holiday dinners. To serve, just add two ounces of the infused whiskey to an ice-filled lowball and sip. Or, chill the infusion before serving and drink without any ice at all. This infusion isn’t one I typically mix, though you could create a cocktail out of it by topping it off with some apple juice or ginger ale, or even spiking some hot cider with it. I tend to make a jar of this infused whiskey in the fall and let it infuse for a couple of months—so it’s ready just in time for the holiday season.
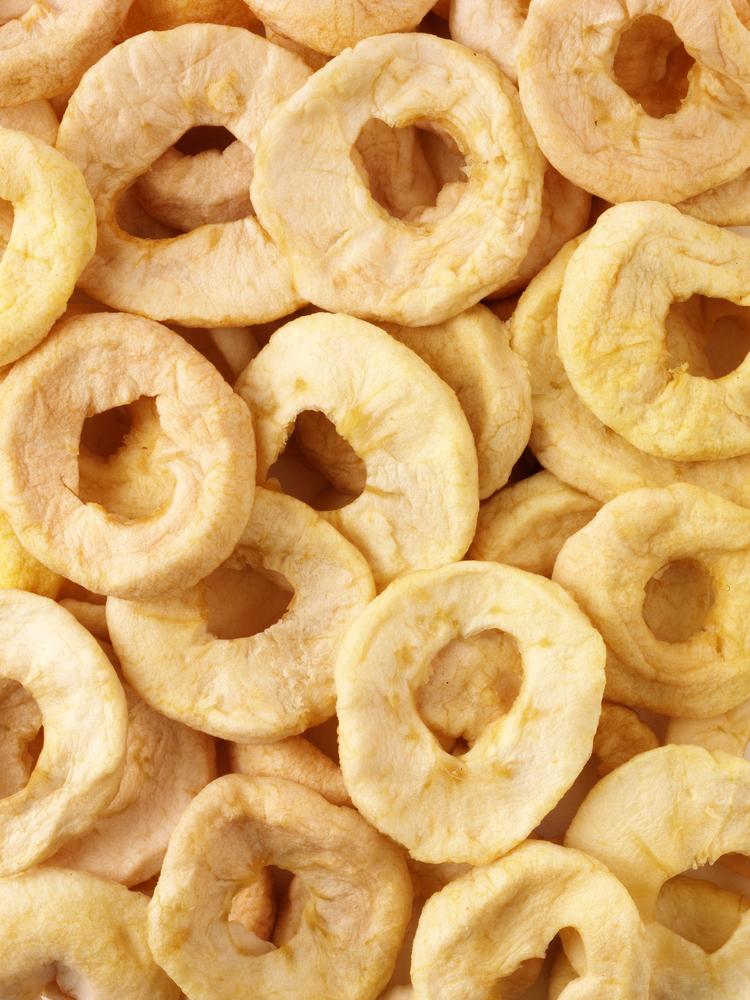
Dried Apple Slices
- Apples
- Ground cinnamon, to taste
You can use either a food dehydrator or an oven at a very low temperature setting. If using a food dehydrator, dry at 135 degrees F for 4-plus hours. If drying with an oven, set the temperature as low as it will go (175 to 200 degrees F) and bake for 2 to 3 hours. Either way, you’ll want to check on the apples occasionally to test for doneness. Humidity in your home will impact how long the apples take to dry. Apples should be chewy when dried, but not moist. Test them by folding them in half; if the sides don’t stick together, they are ready.
Allow apples to cool completely and store them in an airtight container.
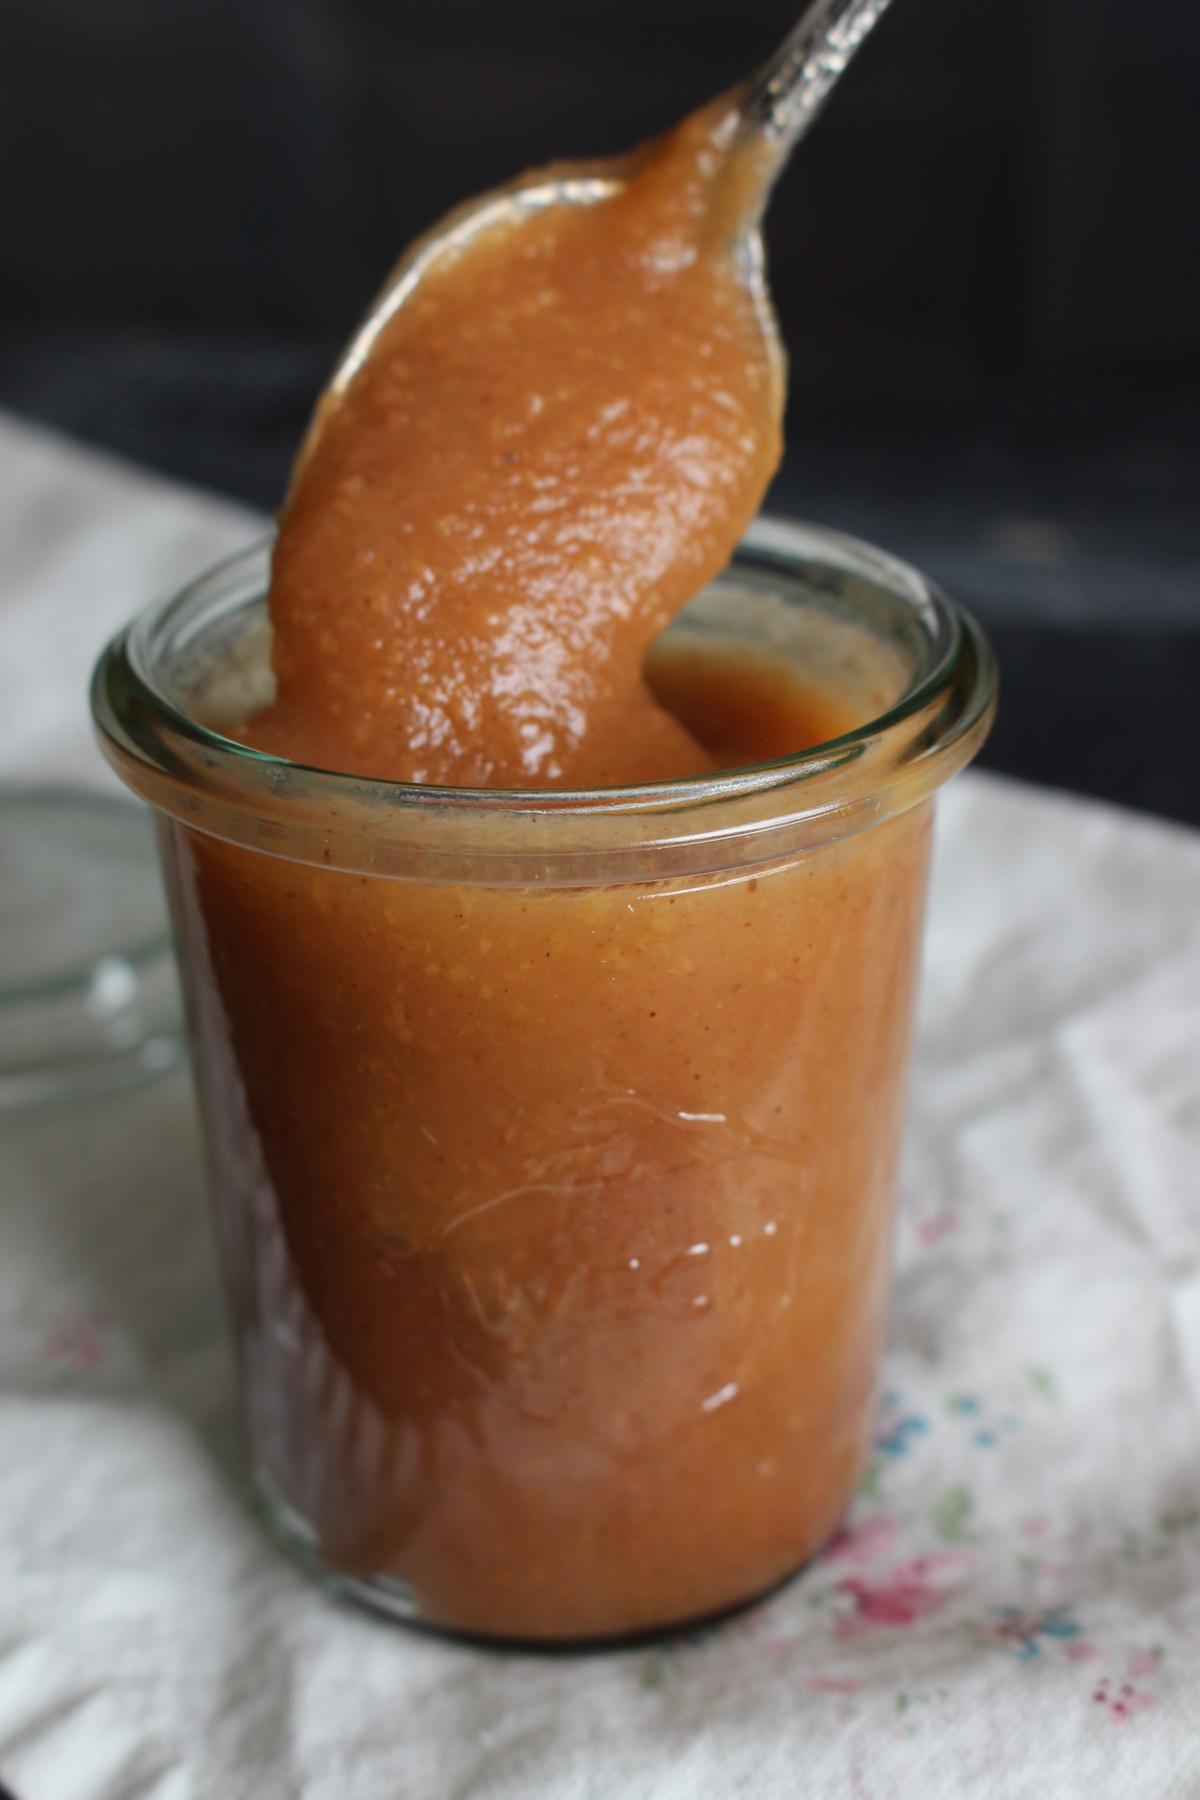
Fall-Spiced Apple Butter
Makes 4 (8-ounce) jelly jars- 3 pounds apples, cored and cubed (8 to 9 cups) (see Recipe Note)
- 1/4 teaspoon canning salt
- 2 tablespoons lemon juice
- 1/4 cup apple cider vinegar
- 1 cup water
- 1/4 cup honey (or maple syrup)
- 1/4 cup brown sugar, loosely packed
- 1 tablespoon ground cinnamon
- 1/4 teaspoon ground cloves
- 1/4 teaspoon vanilla extract (optional)
- 1/8 teaspoon ground allspice
Once apples have softened and can be easily pierced with a fork, remove them from the heat and allow them to cool for a few minutes. Using an immersion hand blender (or working in batches with a blender of choice), puree the apples for 1 to 2 minutes until they reach a smooth, silky consistency. Be mindful not to splash any of the hot mixture on yourself as you blend.
Add in the remaining ingredients and mix well. Spoon out a small sample to taste test. Determine if you want to add additional seasonings.
Once satisfied with the flavor, turn up the heat and bring the mixture back to a simmer. Leave uncovered and simmer for 20 minutes, or longer if needed, until the apple butter reaches a thick consistency. To test the consistency, scoop a spoonful of apple butter into a glass or ceramic dish, then put the dish in the fridge or freezer for a few minutes to cool. Once cooled, turn the dish on its side; the apple butter shouldn’t move, or move very little. If it passes the test, it has reached the correct viscosity and is ready to can (or refrigerate).
Ladle the hot apple butter into clean, warm jars. Leave 1/4-inch headspace at the top of each jar. Wipe the rims clean and place the canning lids on the jars. Screw the rings on until the lids fit just snug on the jar, not fully tightened.
Carefully lower the jars into a hot water bath and cover with the lid. Turn the heat to high. Once the water begins a rolling boil, set the timer and process in the water bath for 10 minutes. Adjust cook time for altitude as needed.
Carefully remove the jars from the hot pot with canning tongs. Place the jars on a towel-lined surface for 12 hours without touching. After 12 hours, remove the jar rings and test to make sure that the lids have securely sealed onto the jars. Label and date the jars.
These preserved jars of food will keep for at least one year in the cupboard. Refrigerate after breaking the seal.
Recipe Note
This recipe can be made with any type of apple; however, juicier apples will require a longer simmer time to finish.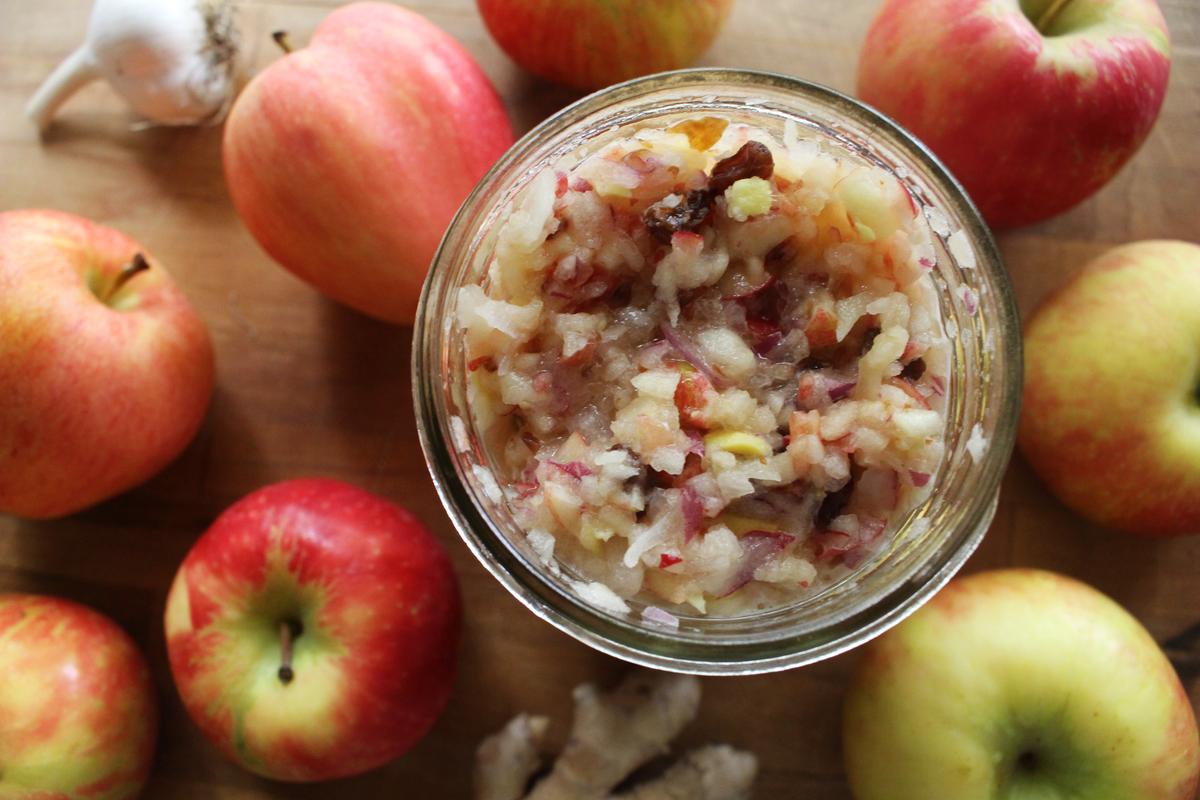
Fermented Apple Chutney
Makes 1 pint- 2 apples, cored
- 1-inch piece (about 1 tablespoon) ginger root, peeled
- 1/4 cup red or golden raisins
- 1 cup sliced red onion (from about 1/2 red onion)
- 1 garlic clove
- 1/4 cup dried apricots (optional)
- 2 teaspoons apple cider vinegar
- 1 tablespoon raw honey (or maple syrup)
- 1/2 teaspoon kosher salt
Wipe the rim of the jar clean, add the lid, and tightly screw on the ring. Ferment chutney at room temperature, ideally between 60 to 75 degrees F, and keep out of direct sunlight.
Fermentation duration is between 2 to 4 days. Once a day, unscrew the canning ring to “burp” the ferment, so that the built-up gases created during fermentation can release. Taste test daily to see how the flavors transform. Stir the mixture, pat it back down, and tightly screw the ring back on.
Once you are pleased with the finished flavor, transfer the chutney to the refrigerator. For the best taste and texture, enjoy within two weeks.
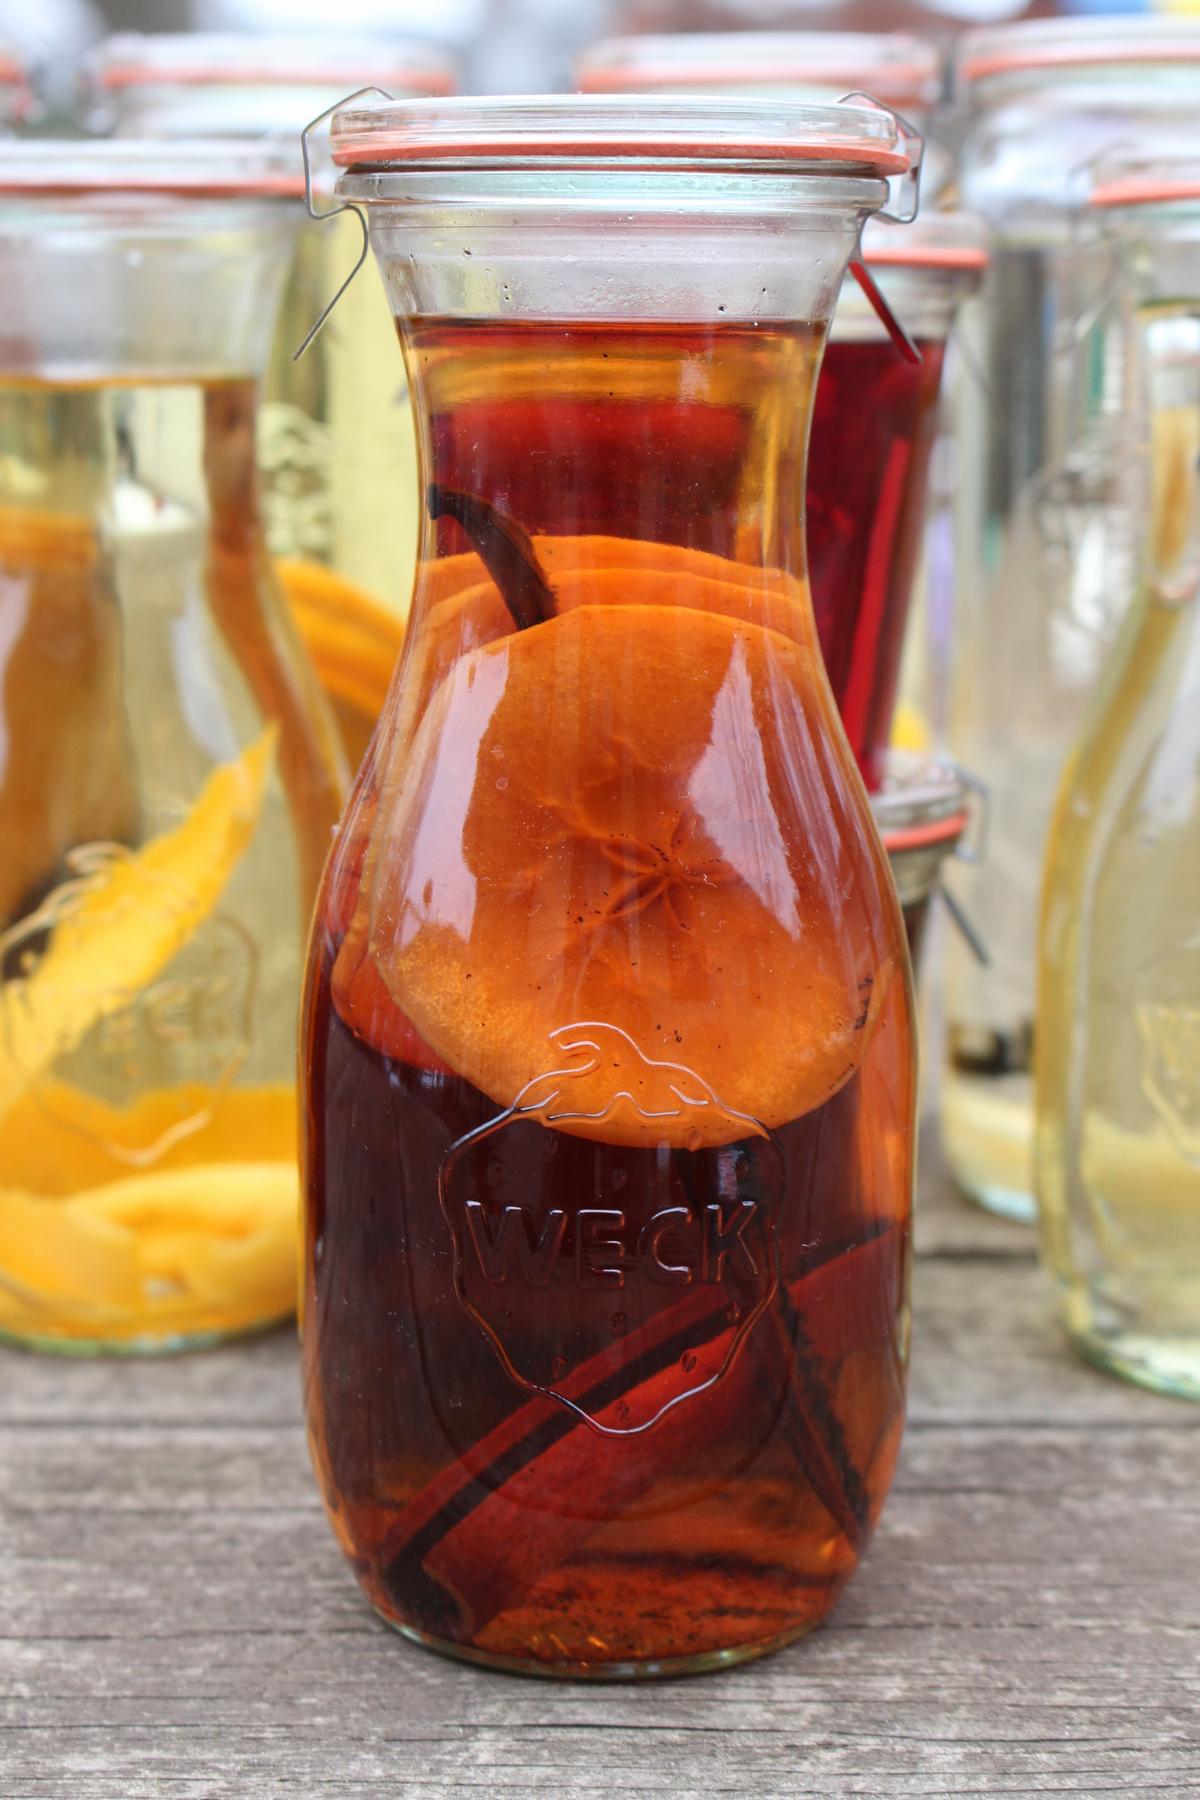
Apple Pie Infused Whiskey
Makes 1 pint- 2 dried apple slices
- 1 vanilla bean
- 1 cinnamon stick
- 2 cups whiskey of choice (as needed)
Keep at room temperature and out of direct sunlight. We store our infused liquors in the cupboard with the rest of our liquor. Allow the fruit to infuse with the alcohol for at least two weeks before enjoying; the longer it infuses, the more flavor it will have. Tip the jar upside down every few days to blend the infusion.
Once infused, you can either strain out the solids or leave them in.