If you plan to build it in the comfort of your basement or workroom, keep in mind that eventually you will have to move it outdoors. Measure the size of your doors before completely assembling it. It is usually a good idea to do the final assembly in your garage.
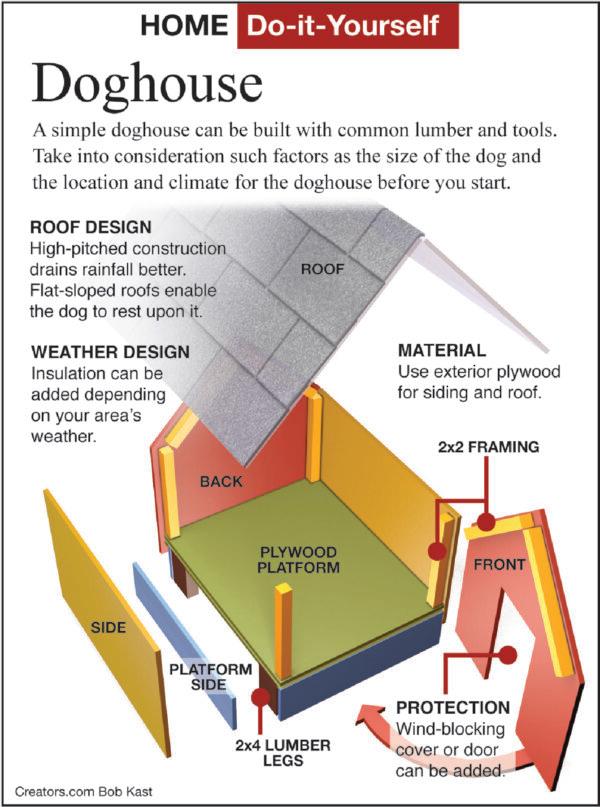
A shingled roof is most durable and weatherproof, just like on your house, but if you think your dog will sit on top of the house, don’t use shingles. They can get very hot in the summertime. Use an exterior plywood panel instead. If your dog is a chewer, avoid pressure-treated lumber, even for the feet.
You should be able to get by with one 4-by-8-foot sheet of exterior siding for an average-size dog (under 50 pounds). Draw templates of all the pieces on the back of the siding first to make the best use of the material.
Now, carefully saw on the lines. For this normal-size doghouse, plan on two 22-by-32-inch roof pieces (for a pitched roof), two 16-by-26-inch side pieces, two 21-by-26-inch bottom pieces (double bottom for strength), and a front and back piece that is 16 by 22 inches with a 27-inch peak in the center. Cut the hole for the door just large enough for your dog to enter.


The next step is to cut the lumber to build the base that the doghouse is built on. This raises the floor above the ground to prevent water from entering on rainy days. It keeps the house elevated from the cold ground in the winter months. Cut four 6-inch-long legs and two 23-inch and two 21-inch base pieces.
Double check that the base is square and nail its four sides together. Nail the legs against the inside edges of the side bases. Place the first floor piece on the base frame. Make sure that it does not hang over any edges of the base. If the floor pieces weren’t cut straight, trim off the excess with a plane and nail both floor pieces in place.
Now, before it is too late, head out into the garage with all your pieces. Use standard 2-by-2 lumber for roof and wall supports. Nail these to the inside edges of the top and sides. Recess them up 3 1/2 inches on the sides, front, and back. This allows the sides to extend down and cover the base for a professional look.
Put one of the sides in place and nail it to the base, and then put the other side on and nail it too. Line the back piece up with the sides and nail it to the base and to the 2-by-2 supports. Do the same with the front piece.
Nail the first roof section into place. Before nailing on the last roof piece, check for any exposed nails and cut or file any edges that could hurt the dog. Nail the final roof piece on. Attach the shingles and paint the exterior if desired.