
As the days start to grow longer, outside temperatures grow warmer, and the landscape awakens from its winter sleep, our opportunity to start our garden is upon us. We can begin the process of starting our garden from seed.
Why Start From Seed?
There is just something satisfying about the process of nurturing plants from start to finish.You will also be able to take advantage of a wider variety of plant options by starting from seed. For beginning gardeners, I recommend lettuce, kale, spinach, squash, cucumbers, green beans, zucchini, radishes, and carrots. If you want to add some flowers to your mix, I would recommend zinnias and sunflowers.
Once planted, our seeds will require constant attention to ensure their health and well-being, which will give us opportunities to teach our young gardeners some life lessons along the way. As you establish some daily tasks, such as watering and turning the pots to face the sun, the diligence and sense of responsibility required of your little gardeners will help them grow just as the seeds do.
Prepare Your Pots
In this second installment of Growing Gardeners, we’ll start by making the small pots in which we will plant our seeds. We start the seeds in these pots so we can first keep them indoors, in a climate-controlled environment, safe from the fluctuation of temperatures outside. If you plan to keep your plants in pots indoors or on a balcony, instead of a larger outdoor garden, you can plant them directly.We are folding our pots from newspapers, since they will be biodegradable and make the transfer of our seedlings into the garden much easier. This is an activity the entire family can enjoy, while cultivating skills such as precision and following instruction. Once you have created one, you will become an expert and find yourself making more in a matter of minutes.
DIY Newspaper Seed Pots, Step-by-Step
You will need:- Some old newspapers
- One 15-ounce can
- Potting soil
- A waterproof tray with high sides, big enough to fit several 15-ounce cans
Prepare a Strip of Newspaper
For each pot you want to make, you'll need to cut one sheet of newspaper roughly 22 inches by 12 inches. Start by folding the sheet in half lengthwise, to create a strip about 22 inches long and 6 inches wide.Create a Cylinder
Orient your folded newspaper strip vertically in front of you. Set the can on its side at the bottom of the strip, so that the bottom of the can is just about aligned with the folded edge of the newspaper, while the cut edge of the newspaper sticks out about 2 inches past the top of the can.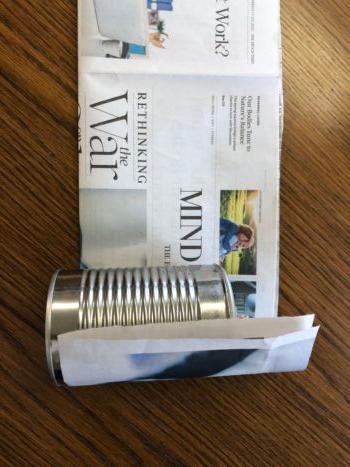
Wrap the bottom edge of the newspaper up and around the can, then roll the can up the length of the newspaper, allowing the newspaper to wrap around the can to create a cylinder. Stand your newspaper-wrapped can upright.
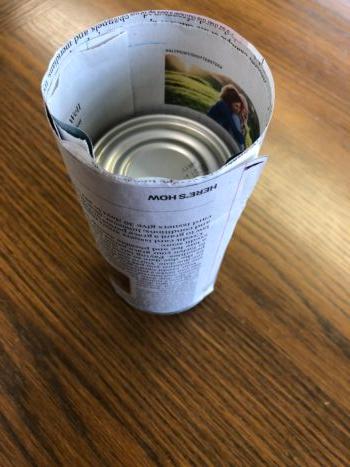
Create the Base of the Pot
Starting at the outer seam, fold the top edges of the newspaper cylinder inward, over the top of the can.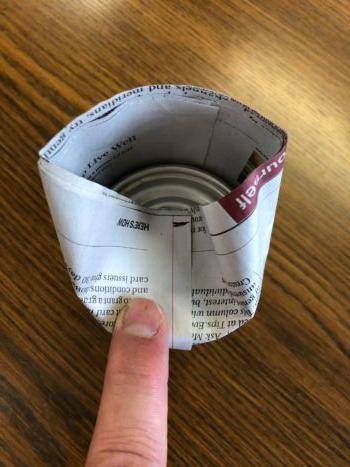
Moving around the top of the can, make three more overlapping inward folds to create the base of the pot. Apply firm pressure as you make each fold to make the bottom as secure as possible.
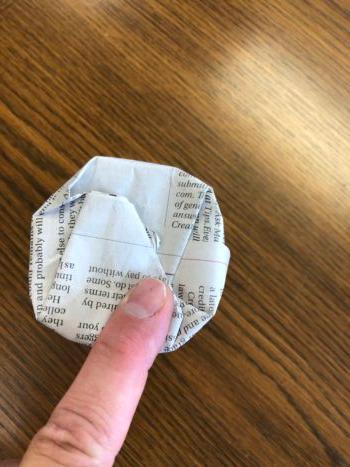
Remove the Can and Fold the Top Edges
Slide the can out of your newly created pot, and stand the pot upright on the base you just formed. Starting again at the outer seam of your newspaper cylinder, fold the top 1/2 inch of the pot inward, down into the pot, to create a stable rim.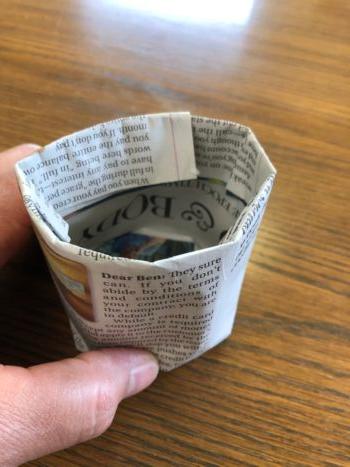
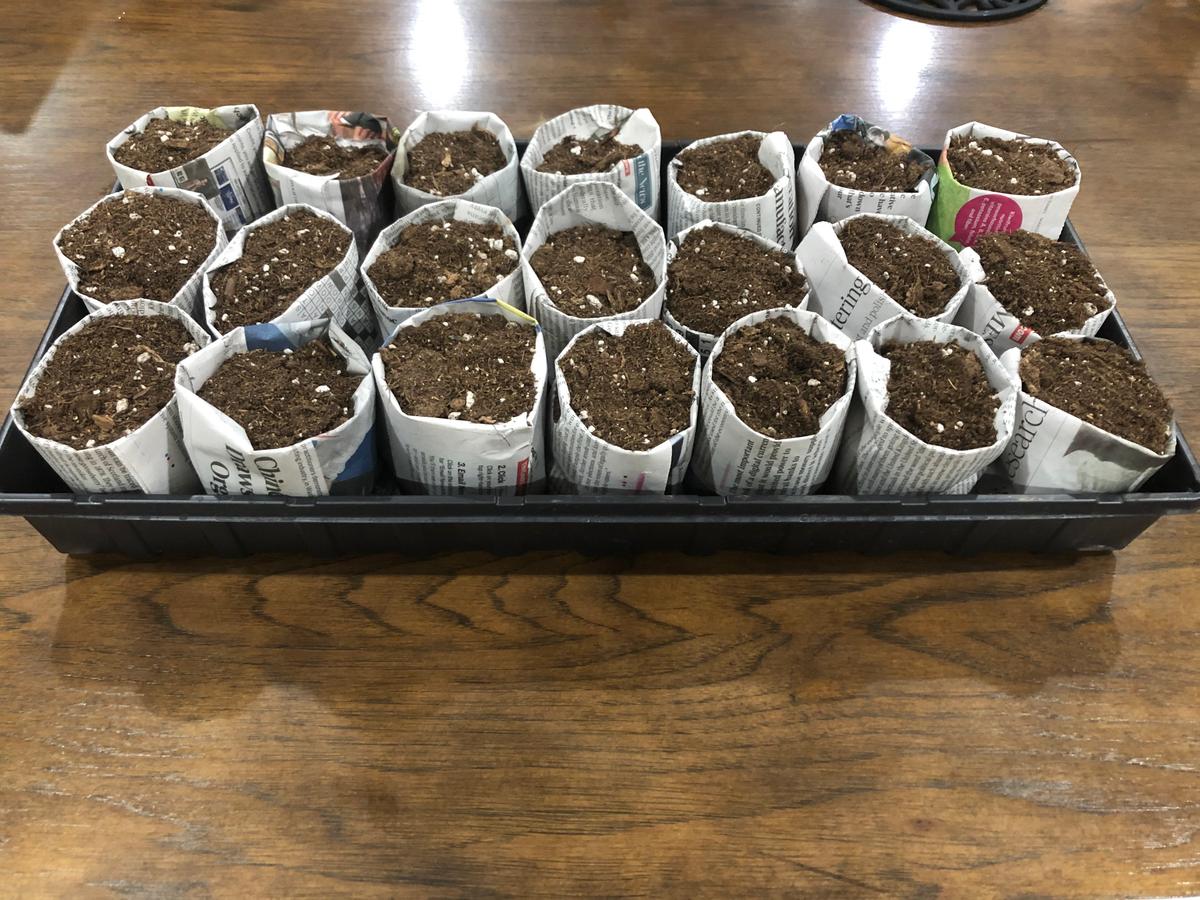
Give Your Pots Support
Place your pots in a waterproof tray that has high enough sides to support the sides of your pots. As you move this tray, you don’t want your pots full of dirt and little plants to go tumbling to the floor. You will want to make enough pots to fill your tray, so the pots can provide some amount of support to each other as well.Add Soil, a Little Water, and Your Seeds
Once you have completed your pots and collected them in a tray, you will want to fill each pot with potting soil. Potting soil is very fluffy and will compact once you add water, so make sure your pots are full.Add a little water to each pot to moisten the soil. This needs to be a slow drip from the faucet, to turn the potting soil from a light color to dark. The soil should feel moist to the touch, but not be saturated to the point where you could squeeze water out of it with your hand. Don’t be afraid to push the soil down a little and add more. The moistened soil level should be higher than the bottom of the folded rim of each pot—in other words, within a 1/2 inch of the top of the pot.
Read your seed packet to determine the depth at which the seeds should be planted. Use your finger to create a small space to the appropriate depth, add a seed, and cover it with soil. You will want to follow this same process to plant a second seed in each pot as a backup, since many times you will have seeds that don’t germinate. If both seeds grow and become plants, we will have to thin them later.
Place your tray in a sunny area that gets at least four hours of sun each day. You will also want to keep your soil moist. The best way to do so is to use a small spray bottle to gently mist the soil and your small plants.
Monitoring your plants daily is crucial, as we count their leaves until the time to transplant them in the garden. As a general rule of thumb, we will move them after they have three to four fully developed leaves, which will happen over the next two to four weeks.
- What part of this activity did you and your young gardeners most enjoy? What part was most challenging?
- Encourage your young gardeners to be curious. What questions did they have about the structure of the pots, or the planting of the seeds?
- What are you most looking forward to this spring?


