I Made This ‘Exploding Cocoa’ Once and I’ll Never Go Back to the Boxed Kind

This decadent chocolate drink is satisfying to make and impressive as a gift.
I Made This ‘Exploding Cocoa’ Once and I’ll Never Go Back to the Boxed Kind
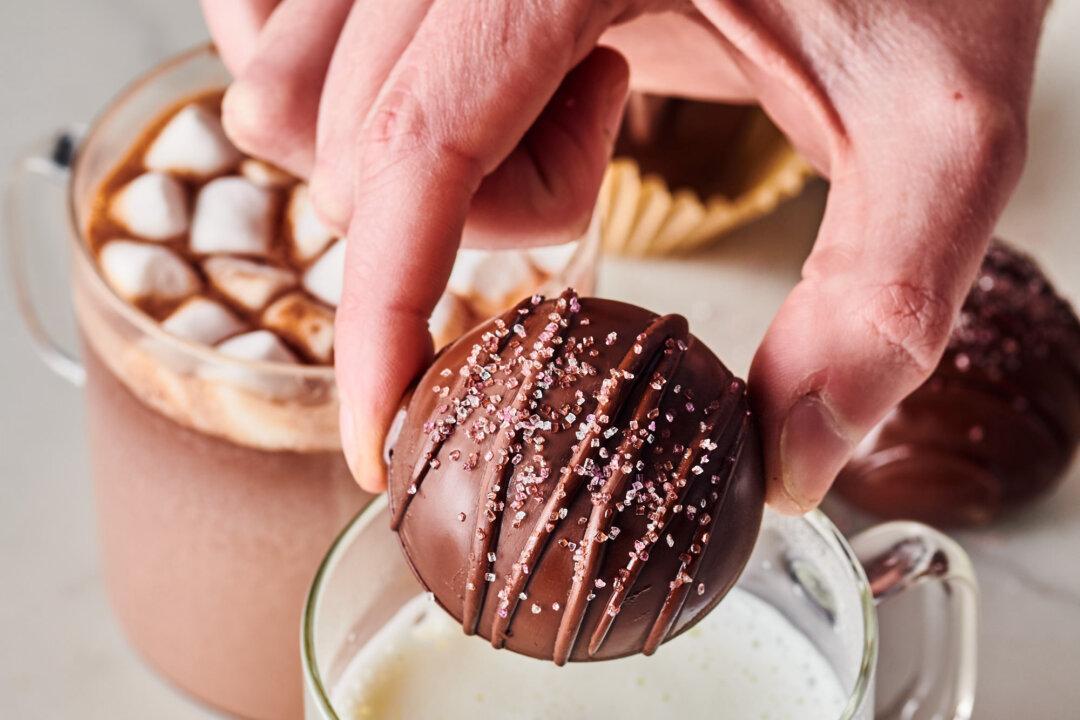
Hot chocolate bombs are an impressive and fun DIY gift that kids and adults alike will enjoy. (Joe Lingeman/TNS)
12/19/2023
Updated:
12/21/2023
0:00

Now that winter has arrived, it’s nearly impossible to open Instagram or TikTok without being greeted by an exploding hot chocolate bomb. The tasty trend is popular for a reason: When these chocolate spheres are dropped into warm milk, they crack open in the most mesmerizing way, releasing a flurry of hot cocoa mix and marshmallows and creating a decadent cup of hot cocoa.

Hot chocolate bombs are the perfect project for holiday gift-giving, Valentine’s treats, and snow days home with the kids. Follow our step-by-step guide for tempering chocolate to make these gorgeous hot cocoa bombs at home. The best part—you don’t even need a mold (unless you really want one). Here’s everything you need to know.

What Are Hot Chocolate Bombs?

Hot chocolate bombs—also called hot cocoa bombs—are spheres of tempered chocolate filled with hot cocoa mix, mini marshmallows, and sometimes sprinkles. When added to hot milk, the chocolate spheres melt, releasing the cocoa mix and creating a tasty cup of hot chocolate.
According to The Washington Post, the first viral hot cocoa bomb was shared by photographer Eric Torres Garcia, who went on to create an entire cocoa bomb company. More than just a hot cocoa delivery system, hot chocolate bombs are a creative edible gift you can have a lot of fun making and giving away.

A Quick and Easy Way to Temper Chocolate

Tempered chocolate, or chocolate composed of a network of stable crystals, is what gives these bombs their shiny finish and snap. If you come across a recipe for hot chocolate bombs that suggests you can make them without tempering—most likely by chilling them in the fridge—move along.

Tempering chocolate is crucial for hot chocolate bombs, and while it has a reputation for being finicky, the method we’re using here, called the seeding method, is easy and utterly foolproof.

1. Melt two-thirds of the chocolate: Melting two-thirds of the chocolate on the stovetop in a heatproof bowl set over a pot of simmering water, or in the microwave in 30-second bursts. Melt the chocolate completely without exceeding 100 F. (If you don’t have a thermometer, use your fingertip as a guide. It should never be too hot to touch.)
2. Add the rest of the chocolate in three batches: Remove the melted chocolate from the heat, and add the remaining chocolate in three batches, stirring until incorporated after each addition.
3. Stir until chocolate is between 88 F and 91 F: Keep stirring until the chocolate is about body temperature.
4. Test for temper: Test a bit of the chocolate before making the bombs by swiping a small amount on a piece of parchment paper. It should begin to set immediately. If it doesn’t, add more chopped chocolate, 1 tablespoon at a time, testing again after each addition.

What Chocolate is Best for Hot Chocolate Bombs?

Higher-quality chocolate makes tempering much easier. I’m a big fan of Guittard chocolate wafers and Ghirardelli chips. If you buy a larger hunk of chocolate or chocolate wafers, make sure it doesn’t have a gray or white film, called bloom, on them. Bloom indicates the chocolate has been exposed to higher or lower temperatures and has already gone out of temper. If the bar in your pantry has any bloom, it’s probably just surface level and tempering will remove it, so don’t stress.

Can I Make Hot Chocolate Bombs Without a Mold?

Yes, but it depends on what look you’re going for.

No mold required: Trust me when I say I tried all the ways to make hot chocolate bombs without a mold (a plastic-wrapped egg, empty plastic Easter eggs, an orange) and paper cupcake liners are by far the easiest with the best results. Avoid foil-lined liners—the chocolate will get stuck.

Silicone molds: For the perfectly round hot chocolate bombs that float, sink, and then explode, you’ll need two (2-inch diameter) half sphere silicone mold trays with six cavities each. Smaller spheres don’t hold enough hot cocoa mix, and bigger spheres won’t fit in a standard mug.

Gifting and Serving Hot Chocolate Bombs

Hot chocolate bombs keep well at room temperature in an airtight container for several weeks. Use cupcake liners to hold the bombs for gifting and storing. Not only do they look cute, but they’ll also keep your perfectly tempered chocolate from getting damaged by fingerprints and will keep the bombs safe during transport.
When you’re ready to serve the bombs, get your favorite milk boiling hot (the warmer the milk, the more dramatic the explosion will be). Pour the milk into your mugs, add a bomb, and watch with delight as the chocolate melts, making nearly instant hot chocolate. And because you’ve doubled down on the chocolate—cocoa mix inside a chocolate shell—the resulting cup of cocoa will be deliciously decadent!

Hot Chocolate Bombs

Makes 6 hot chocolate bombs
Ingredients
  • 12 ounces high-quality semi-sweet chocolate bars or chips, such as Ghirardelli
  • 1/4 cup hot cocoa mix
  • 18 to 24 mini marshmallows
  • Sprinkles, for decorating (optional)
  • 6 cups whole or 2 percent milk, for serving
Equipment:
  • Chefs knife and cutting board
  • Measuring cups and spoons
  • 2 (2-inch) silicone sphere molds with 6 wells each, or 6 parchment paper cupcake liners
  • Digital probe thermometer
  • Large heatproof bowl
  • 4-quart pot
  • Pastry brush
  • Nitrile or latex gloves
  • Small piping bag (optional)
  • Muffin papers, for packaging (optional)
Directions

Temper the chocolate:

1. Set up a double boiler. Fill a 4-quart pot halfway with water and set over medium-high heat. Find a heat proof bowl that fits securely on top of the pot without touching the water.

2. Chop and temper the chocolate. If using bars, finely chop 12 ounces semisweet chocolate. Set 1/3 aside (about 4 ounces). Transfer the remaining 2/3 (8 ounces) to the bowl and fit over the double boiler. Melt the chocolate in the double boiler, stirring regularly with a heatproof spatula to help with melting and keep it from getting too hot. Keep an eye on the chocolate temperature—it should never get too hot to touch but you can check this using a digital probe thermometer—do not exceed 100 F.

3. Remove the bowl from the double boiler. Add the reserved chocolate in three increments, stirring until incorporated and melted after each addition. Continue mixing until the chocolate is between 88 F and 91 F. You can check this with a digital probe thermometer or by touch—the chocolate should be about body temperature, so test on the back of your hand or wrist.

Option 1: With silicone mold trays

1. Coat the molds with the tempered chocolate. Drop 1 tablespoon tempered chocolate into each well of 2 (6-count, 2-inch wide) half sphere silicone mold trays. Use a brush to spread the chocolate up the sides and over the edges of the molds by just a bit. Let sit at room temperature until the chocolate is hardened, 5 to 15 minutes. Brush the wells with more tempered chocolate (about 1 teaspoon each) to achieve a thick, even coating.

2. Let sit at room temperature until completely hardened, 15 to 30 minutes.

3. Fill half the spheres with cocoa and marshmallows. Place 2 teaspoons hot cocoa mix, 3 to 4 mini marshmallows, and 1/2 teaspoon sprinkles if desired into 6 of the wells.

4. Paint or pipe a border of chocolate on the unfilled shells and assemble the bombs. Wearing nitrile or latex gloves, gently release the remaining 6 unfilled shells from their molds, but keep them resting in the well. Use a pastry brush or a small piping bag to coat their edges with tempered chocolate. (If the chocolate has cooled and lost its temper, place it back briefly over the double boiler until warmed back to between 88 F and 91 F.)

5. Top each marshmallow-filled shell with a coated, unfilled shell to form a sphere. Let sit at room temperature to harden and set, 30 to 45 minutes.

Option 2: Without a mold

1. Coat cupcake liners with chocolate. Drop 1 tablespoon tempered chocolate into each of 6 parchment paper cupcake liners. Use a brush to coat the bottom and sides of the liners with the chocolate. Let sit at room temperature until the chocolate is hardened, 5 to 15 minutes.

2. Brush the liners with more tempered chocolate (about 1 teaspoon each) to achieve a thick, even coating. Let sit at room temperature until the chocolate is completely hardened, 15 to 30 minutes.

3. Fill with cocoa and marshmallows. Place 2 teaspoons hot cocoa mix, 3 to 4 mini marshmallows, and 1/2 teaspoon sprinkles if desired into each liner.

4. Close the bombs with more chocolate. Drizzle 1 tablespoon tempered chocolate over the filling in each liner. Use the back of a small spoon to smooth the chocolate over the filling to completely enclose it. Let sit at room temperature until the chocolate is completely hardened, 30 to 45 minutes. (If the chocolate has cooled and lost its temper, place it back briefly over the double boiler until warmed back to between 88 F and 91 F.) Wearing nitrile or latex gloves, gently release the chocolate bombs from the liners.

Decorate and serve:

1. Drizzle with any remaining chocolate and add sprinkles (optional). Before storing, you can decoratively drizzle the bombs with any remaining chocolate and add sprinkles to garnish if desired. Use gloves when decorating or moving the cocoa bombs to prevent fingerprints.

2. Serve the chocolate bombs. Heat 1 cup milk for each hot chocolate bomb gently on the stovetop or in the microwave for about 2 minutes until very hot, almost to a boil. Pour the hot milk into a large mug and gently add the bomb for the most dramatic explosion. After the bomb melts, stir vigorously to incorporate into the milk.

Recipe note: Store hot chocolate bombs in an airtight container at room temperature for up to two weeks.

Dear Readers: We would love to hear from you. What topics would you like to read about? Please send your feedback and tips to [email protected].
Meghan Splawn is a contributor to TheKitchn.com, a nationally known blog for people who love food and home cooking. Submit any comments or questions to [email protected]. Copyright 2022 Apartment Therapy. Distributed by Tribune Content Agency, LLC.
Related Topics