Ask the Builder: Building a Stone Wall and Arch

Ask the Builder: Building a Stone Wall and Arch
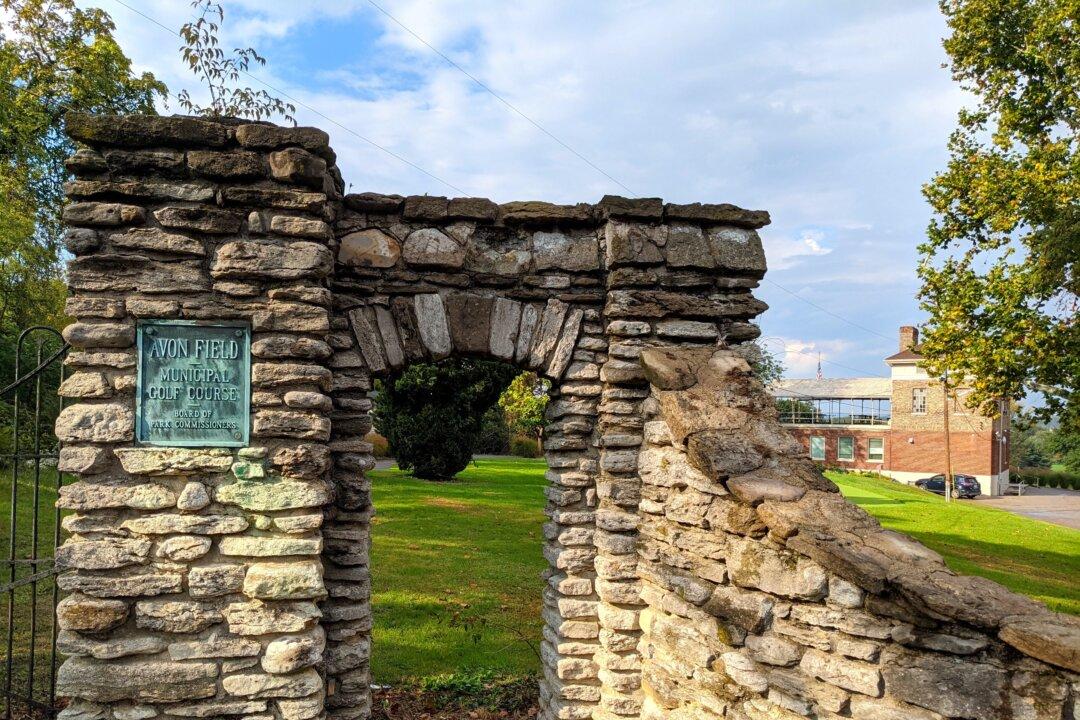
This handsome stone gateway is at a municipal golf course in Cincinnati. My grandfather, who was a baker, built decorative garden walls and arches like this. So can you! (Tim Carter/TNS)
3/10/2022
Updated:
3/10/2022

My grandfather was a baker in Cincinnati in the very early 1900s. He and my grandmother owned and operated a neighborhood bakery in the Clifton Heights neighborhood, just 400 feet from where I was born.

When he retired, he decided to build an eight-unit apartment building just down the street from the bakery. He named it Valley View because it had a commanding view of the Mill Creek Valley. I never got to meet him, as he was sent to Heaven fifteen years before I was born.

There are quite a few photos in the family albums of him standing next to limestone walls, arches and even a stone fountain he built with his own hands in the apartment building’s gardens. How he managed to build such gorgeous structures is a bit of a mystery. Keep in mind there were no YouTube videos to watch, probably no great DIY books at the local library, or home improvement shows to watch on cable TV. Somehow, somewhere my grandfather gleaned the information to build stone walls and arches on his own. You can do it to with his inspiration and a little help from me.

Almost all stone is suitable as a building material for outdoor walls, arches and fountains. After all, the rock most likely has withstood thousands of years of exposure before it was quarried or hand-picked from a road cut or stream bed. My grandfather used pieces of fossiliferous limestone that is abundant in Cincinnati. Limestone is an excellent material to use. There are thousands of buildings all over the USA that use fine-grained limestone for their facades. It’s extremely durable.

Whenever you build with stone outdoors, it’s wise to install a sturdy foundation or footing. If you live where the soil freezes, be sure the bottom of this footing is below the local frost level. The footing helps spread the load of what you’re building on the soil below. I prefer my footings to be poured concrete at least 8 inches thick with 5/8-inch-diameter steel bars in it every 2 feet on center to ensure the footing doesn’t fall apart or bend. The footing should be no less than 2 feet wider than the wall or arch structure you’re going to build.

If you’re building a retaining wall that’s 4 feet high or shorter, you’ll rarely get into trouble. The issue with retaining walls is the tipping force increases at a greater rate the higher the wall goes. Any wall over 6-feet tall should be designed by a structural engineer who has a deep history of producing plans for retaining walls.

Laying stone can be challenging, and I recommend that you build a small test structure first to get the hang of it. Be sure the stone is clean and dust-free so the Portland cement mortar will adhere well. Most stones you work with are slightly tougher to work with than brick. Brick has suction. That is, the brick absorbs the water in the mortar quite fast. This allows the mortar to get stiff within minutes of laying the brick.

This doesn’t always happen with stone, so you often have to make the mortar mix a little drier. When my grandfather worked with limestone, his mortar mix almost certainly resembled mashed potatoes, not applesauce.

I recommend you use a strong mortar that’s one part Portland cement, three parts medium or coarse sand, and 1/2 part hydrated lime. The hydrated lime will make the mortar a little more sticky and will greatly enhance the strength of the mortar over time. All three ingredients are quite inexpensive.

If you have the time and want extra adhesion between the mortar mix and the stone, you can coat the top of each stone with cement paint just before applying the mortar mix. Most people won’t have the patience to do this. Cement paint is just a mixture of Portland cement and clear water. You blend the two so it’s the consistency of regular latex paint.

Stone arches are not that hard to build. The internet is littered with videos and photographs of the kind of arch form you need to build using plywood or oriented strand board. The arch form needs to be as wide as the stones that are being used to create the arch.

The walls that the arch sits upon need to be substantial. You can get clues, guidance and inspiration once again from the plentiful photographs of arches on the internet. You need to realize that gravity is pulling on the arch and wanting to spread the vertical walls below it apart. Robust walls will resist Mother Nature’s desire to bring the walls to the ground for many many decades.

To give you an idea of how big to make the walls, have a look at the limestone archway that graces the entrance to Avon Fields Golf Course in Cincinnati, pictured with this column. The arched opening is about 3 feet wide, and the walls on either side of this opening are just a little bit wider than 3 feet as well. This stone arch has been in place for almost a century with minimal maintenance, and it still looks magnificent.

Before you start your project, I urge you to look at hundreds of photographs of stone walls, arches and so forth to get an idea of what’s possible. Pay close attention to how the mason cut and fit the stones in the arch. I know you can do this. Just think of the company you’ll be in!

Tim Carter is the founder of AsktheBuilder.com. He's an amateur radio operator and enjoys sending Morse code sitting at an actual telegrapher's desk. Carter lives in central New Hampshire with his wife, Kathy, and their dog, Willow. Subscribe to his FREE newsletter at AsktheBuilder.com. He now does livestreaming video M-F at 4 PM Eastern Time at youtube.com/askthebuilder. (C)2022 Tim Carter. Distributed by Tribune Content Agency, LLC.
Related Topics