An Ice Cream Cake Sweet With Childhood Nostalgia

An Ice Cream Cake Sweet With Childhood Nostalgia
This fun new twist on ice cream cake is inspired by favorite childhood treats. (Ghazalle Badiozamani/TNS)
8/28/2021
Updated:
8/28/2021

If some of your fondest childhood food memories include packaged snack cakes—Devil Dogs, Yodels, Swiss Rolls, and the like—as well as store-bought ice cream cakes (Baskin-Robbins’ mint chocolate chip cake, I’m looking at you), I guarantee this ice cream-filled Swiss roll cake will rock your world.

The cake is inspired by one I created for my cookbook “The Vintage Baker,” a chocolate Swiss roll filled with pink peppermint whipped cream and covered in peppermint chocolate ganache. It was my first foray into the world of rolled cakes, and I was smitten. Speaking of “smitten,” so, too, was my pal Deb of the food blog Smitten Kitchen, who filled the cake with ice cream. As is always the case with Deb, my first thought was, “Why didn’t I think of that?”

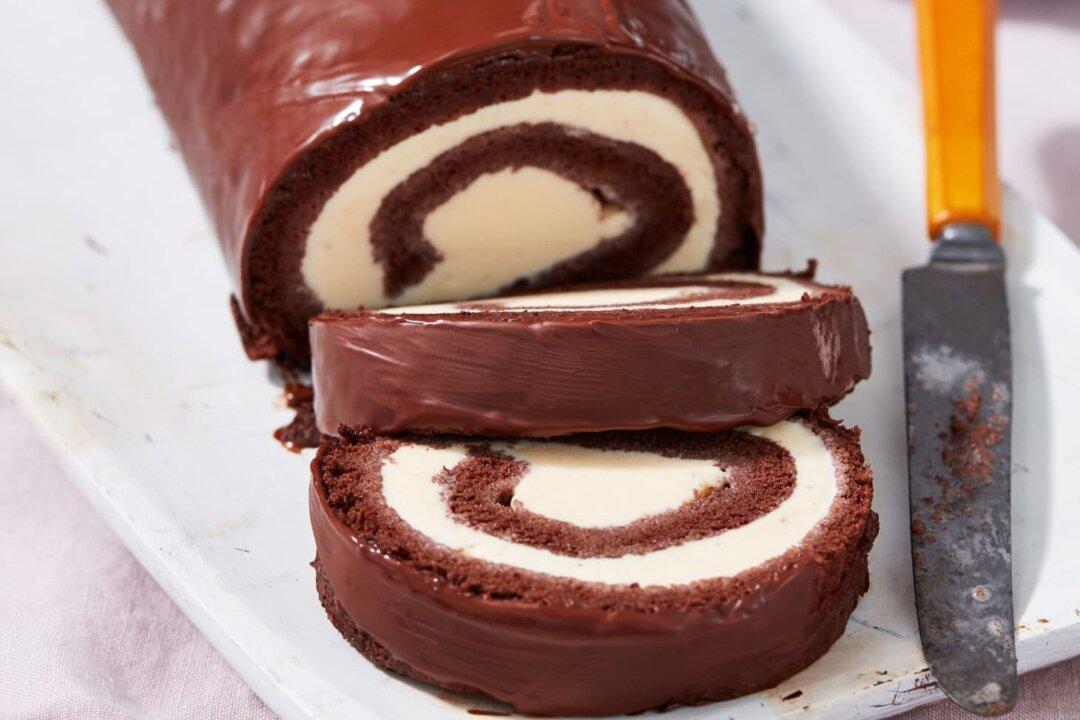
Here, I’ve given it a go myself—and it’s even better than I expected. Filled with vanilla ice cream (as a nod to my beloved Yodel) and draped in shiny DIY magic shell, this fun new twist on ice cream cake is destined to become your go-to summer dessert.

Picking a Pan

While most Swiss roll cakes are baked in a jelly roll pan, this one is made in a 15-by-18-inch rimmed baking sheet (a standard half sheet pan). Not only is it more likely to already be in your kitchen, but it also makes for a larger cake—and who’s going to argue with that?

To keep the cake from sticking, I use a four-part process: First I coat the baking sheet with cooking spray, then I line it with parchment paper, then I spray the parchment, and finally, I dust the parchment with cocoa powder, tapping out any excess. The cocoa powder does double-duty here: It prevents the tender cake from sticking to the parchment and also blends into the dark brown cake instead of standing out like flour or powdered sugar can.

When the cake is done baking, you'll gently roll it up in a dishtowel and let it cool to room temperature, which will help it keep its rolled shape later on.

Filling the Cake With Ice Cream

While I opted for vanilla, you can use any ice cream flavor you like here—just avoid any with big chunks or chips, which may make it harder to roll.
Let the ice cream soften on the counter while the cake is cooling, then carefully unroll the cake and gently spread on the ice cream using an offset spatula or a butter knife. Re-roll the cake without the towel and tightly wrap it in plastic wrap, which will help the roll keep its shape. Freeze until the ice cream hardens, at least four hours or up to one week. When you remove the frozen cake, it’s ready to be bathed in chocolate.

Covering the Cake in Magic Shell

Enrobing this cake in magic shell is ingenious, and it makes the treat look even more like a giant version of a packaged snack cake. Bonus: The chocolate shell covers up any imperfections.

Homemade magic shell is a simple mix of two ingredients: melted chocolate chips and oil (canola, olive, and coconut all work). As soon as you remove the cake from the freezer, pour the magic shell on top and let it sit for a minute for the shell to harden. Then, slice it crosswise and serve immediately (the magic shell will crack if frozen and then sliced).

This fun new twist on ice cream cake is inspired by favorite childhood treats. (Ghazalle Badiozamani/TNS)

Swiss Roll Ice Cream Cake

Serves 16
For the Cake
  • 5 large eggs
  • Cooking spray
  • 3 tablespoons very hot tap water
  • 1 tablespoon espresso powder
  • 3/4 cup packed light brown sugar
  • 2 teaspoons vanilla extract
  • 1/2 cup cake flour
  • 5 tablespoons Dutch-process cocoa powder, plus more for dusting
  • 1 teaspoon baking powder
  • 1/2 teaspoon kosher salt
  • 3 cups vanilla ice cream
For the Magic Shell
  • 1 1/2 cups semisweet chocolate chips (about 9 ounces)
  • 3 tablespoons vegetable, olive, or refined coconut oil, or vegetable shortening
Crack the eggs into the bowl of a stand mixer (or large bowl if using an electric hand mixer). Let sit until room temperature, about 45 minutes.

Meanwhile, arrange a rack in the middle of the oven and heat the oven to 400 degrees F. Coat a 15-by-18-inch rimmed baking sheet with cooking spray. Line the bottom of the baking sheet with parchment paper and coat the parchment with cooking spray. Dust with cocoa powder, tapping out any excess.

Place the very hot tap water and espresso powder in a small bowl and whisk until combined and smooth.

Beat the eggs with the whisk attachment on medium-high speed until lightened in color and foamy, 2 to 3 minutes. Gradually add in the light brown sugar and beat until the eggs have tripled in volume and the batter forms ribbons when the whisk is lifted, 4 to 5 minutes more.

Add the espresso mixture and vanilla extract and beat on medium-low speed until combined. Stop the mixer. Sift the cake flour, cocoa powder, baking powder, and kosher salt into the bowl. Gently fold together by hand with a flexible spatula.

Pour the batter onto the baking sheet and nudge it into the corners with your spatula. Bake until a skewer inserted in the center comes out clean and the cake just begins to pull away from the sides of the pan, 5 to 7 minutes. Meanwhile, place a clean kitchen towel on the counter and sift cocoa powder over it.

Remove the cake from the oven. Immediately sift cocoa powder over the top of the warm cake. Run a butter knife around the edges of the pan to release the cake. Invert the cake onto the cocoa-dusted dish towel and carefully remove the parchment paper. Sift more cocoa powder over the cake. Starting at a short end, gently roll up the cake along with the dishtowel. Place the rolled-up cake seam-side down on a wire rack and let cool until room temperature, at least 30 minutes. Meanwhile, remove the ice cream from the freezer and place on the counter to soften for about 20 minutes before you are ready to assemble the roll.

Carefully unroll the cooled cake. Using an offset spatula or butter knife, spread the ice cream onto the cake in an even layer, leaving a 1/2-inch border. Gently re-roll the cake without the towel. Arrange seam-side down. Tightly wrap the roll in plastic wrap, manipulating the cake a bit once wrapped to tighten up the roll and push together any cracks. Freeze until the ice cream hardens, at least 4 hours or up to 1 week.

About 20 minutes before serving, make the magic shell. Place the semisweet chocolate chips and oil or shortening in a medium microwave-safe bowl. Microwave on HIGH in 30-second bursts, stirring between each burst, until the chocolate is fully melted, 1 to 1 1/2 minutes total. Let the mixture cool until barely warm, about 20 minutes.

Unwrap the roll and place on a serving platter. Immediately pour the chocolate mixture over it. Let sit for a minute for the shell to harden before slicing crosswise and serving. The ice cream roll is best enjoyed immediately, as the magic shell will crack if frozen and then sliced.

Recipe Notes

The cake can be baked, filled, rolled, and frozen up to one week ahead. Apply the magic shell just before serving.

The chocolate-coated cake will keep tightly wrapped in plastic wrap in the freezer for up to a week. Unwrap and let sit about 20 minutes at room temperature before serving so that the shell softens and does not crack when you slice it.

Jessie Sheehan is a contributor to TheKitchn.com, a nationally known blog for people who love food and home cooking. Submit any comments or questions to [email protected]. Copyright 2021 Apartment Therapy. Distributed by Tribune Content Agency, LLC.
Related Topics