My Midwestern family has what I call an adversarial relationship with meat: Cook that stuff completely or we may all die. “How would you like that done?” Done? Yes, please.
I survived to adulthood to discover medium rare and (gasp) rare are delights, not death sentences. I have become perhaps unreasonably insistent that a real burger must be hand-pattied, thick, seared, juicy, and leaning toward the red side of pink on the inside. (I do not discount the dangers of undercooked meats, but I also firmly believe that if you have a reliable source and clean preparation/storage, you have little to fear.)
It’s a Thing
The first claims of origin of the smashburger are in Ashland, Kentucky. About 60 years ago, Bill Culvertson, a Dairy Queen owner annoyed that the franchise wouldn’t allow him to serve burgers, opened Dairy Cheer and had it his way. Perhaps in a moment of “How can I make this easier?” inspiration, a kitchen worker used the bottom of a No. 10 (10-pound) can of beans to flatten a patty. Culvertson liked the result, and thus the smashburger of Dairy Cheer was born. Several Kentucky franchise locations followed.The Good Is in the Details
Have your toasted buns and toppings all prepared before the meat hits the pan, because this is going to go fast. Also, consider powering down the smoke alarms, opening the windows, and turning the range hood fan on high. Visibility is going to take a hit.If you have a flat-top grill or griddle like those in a diner, good for you! Stovetop cooks at home, however, should use a carbonized steel pan, which is perfect for the necessary high heat and smooth surface. Cast-iron is a close second. Do not use non-stick surfaces, as they are not intended for high heat and will deteriorate.
Ground chuck is best, but whatever you use, don’t go too lean, or the burger will fall apart when you flatten it. An 80/20 mix of meat/fat is good. I’ve pushed my luck with 85/15 with iffy results. Roll the meat into three- or four-ounce balls.
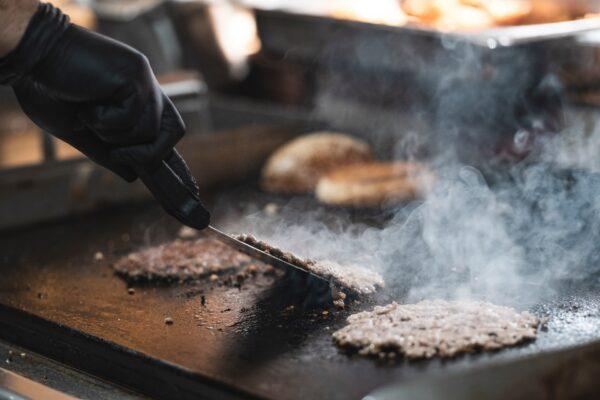
Heat the unoiled pan to high or at least medium-high. You want it nice and hot. Season the meat with just a bit of salt and pepper and perhaps a dash of garlic powder right before you put it in the pan. (I’ve also tried smoked salt.) Drop the burger balls in the pan with room for them to widen out as they’re smashed, and flatten each burger to about a quarter-inch or slightly more as soon as it hits the pan.
You want to use a stiff metal flipper. Beware of flippers with holes in them, as the meat can squish up through those if they are too big or if the meat is too soft. You could use a No. 10 can, and I’ve used the bottom of a small steel pot once. If your flipper is going to stick to the meat, you may want to very lightly wipe some oil over the flipper’s bottom surface. (You could also pre-flatten the patty, I suppose, but then you’ll still need to apply pressure in the pan to get as much of the meat touching the surface as possible, and if you flatten the meat on something other than the skillet first, it may stick and make a mess when you try to transfer it to the pan.)
The key is the Maillard reaction, which occurs when high heat (north of 300 degrees F) breaks down proteins on the surface of meat, resulting in that browning and flavor change of grilled meat (as opposed to boiled or steamed meat). With that wonderful flavor comes a bit of a crunchy texture, which becomes much more part of the bite on a thin piece of meat than on a thicker steak.
Smash once, develop that crust fully, but don’t dry it out or start to burn it. If the burger is thin enough, you may need no more than 60 to 90 seconds of cooking time, and if you go too long, you’ll lose juiciness. The burger will be just about cooked through when you flip it.
To do that, first use the flipper topside down, for better leverage and angle, to scrape up the burger from the pan without demolishing it, but while getting as much of that crust as possible to come up with it. Once loosened, then flip it for the final sear. Slap on the cheese—American slices melt quick and smooth, but I like the stringy stretch of Colby—and get it off that pan in 15 to 30 seconds. The result: No pink, but still juicy and well-crusted.
Dressing Up the Burger
Again, have this all ready to launch before you start cooking the meat. Toast the buns. I’ve become a fan of onion buns; others recommend potato buns or brioche. Whatever you choose, don’t go beyond the diameter of your burger. Also, a thinner patty is going to get lost in a tall puffy bun.Have your cheese slices ready, and perhaps lettuce and fried onions, and pickle slices for that contrary tart note.
While ketchup helped me survive childhood without starving (I’d put it on everything to make it palatable; I was finicky) and yellow mustard is the yin to its yang, I like to branch out a bit. A-1 (or a similar) steak sauce may work, but can be overly bold in flavor. Mayo or garlic mayo works. Like it hot? Maybe Sriracha, or Sriracha tempered with a bit of mayo. I prefer a creamy horseradish sauce, but just a touch.
Smash Burgers
Makes 4 burgers- 4 burger buns, such as onion, potato, or brioche
- 4 slices melty cheese, such as Colby, American, or cheddar
- Condiments and toppings as desired, such as lettuce, fried onions, pickles, ketchup and mustard, mayo, or creamy horseradish sauce
- 1 pound ground beef chuck (80/20)
- Salt and pepper
- Dash of garlic powder, optional
Heat an unoiled carbonized steel or cast-iron pan to high or at least medium-high. Season the meat with a bit of salt and pepper, and perhaps a dash of garlic powder, and drop into the pan with enough room between them to smash. Use a stiff metal flipper to flatten each patty to about 1/4-inch thin as soon as it hits the pan. Cook until the patties develop a dark-brown crust and are just about cooked through, no more than 60 to 90 seconds.
Holding the flipper upside down, scrape each patty from the pan, getting as much of the crust as possible to come up with it; once loosened, flip them for the final sear. Immediately place a slice of cheese on each patty and remove from the pan to a toasted bun in 15 to 30 seconds. Finish with desired condiments and toppings.