The last time Apple released a new version of its OS X operating system on physical media was 2009, in the case of OS X 10.6 Snow Leopard. Since then, new OS X versions are only available for download directly from the Mac App Store.
While this may be a convenient way to upgrade your Mac, it doesn’t leave you with a fallback solution as there is no bootable USB for you to do a clean install (in case your Mac gets corrupted).
Keep the Installer From Being Deleted Automatically
Similar to previous OS X versions, when you download Yosemite from the Mac App Store, it'll automatically be downloaded to your Applications folder. And if you leave it there, the installer will delete itself after Yosemite finishes installing on your Mac.
So, if you plan to use the same installer file on different Macs in the future, or as in this case, you plan on creating a bootable drive, be sure to copy the installer to another location, such as an external drive, before you install Yosemite.
Now there are two different methods to create a bootable USB drive for Yosemite. You can either use a simple graphical interface, or you can use OS X’s built-in Terminal utility. We’ve described both methods below.
Before you get started, make sure you have the following stuff with you:
- An 8GB or larger USB drive or external hard drive (this can be a partition on a larger drive as well)
- The OS X Yosemite installer – this should be ideally placed inside your Applications folder.
- DiskMaker X for your Mac – you can download it from here
Using Diskmaker
1. Once you have Diskmaker downloaded, connect your USB to your Mac and open up DiskMaker X.

2. You'll be presented with options to make installers for either OS X 10.8, 10.9 or 10.10. Click on OS X Yosemite (10.10).

3. Diskmaker should automatically search your system for the OS X 10.10 Installer and should present the file with its location to you. If this is the right installer, click on “Use this copy.”

If it doesn’t detect the installer, click on “Use Another Copy” to navigate to the installer you want to use. Once located, click on Done.
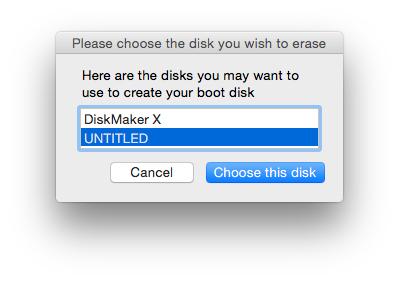
4. Diskmaker will then ask you to select the drive you want to use as a Yosemite bootable drive. Once you select it, it will proceed to format the drive/partition and create a bootable disk. Depending on your Mac and USB type, this process can take from two to thirty minutes. It took around sixteen minutes to create a bootable disk on my USB 2.0 drive on my iMac (Mid-2012).

Once DiskMaker is finished, you'll have a bootable Yosemite installation drive.
And that’s it! You can now use this bootable drive to easily install Yosemite onto multiple computers, or you can use it as a recovery drive for use in the future.
Using Terminal
If the above method didn’t work for you for some reason, you can easily create a bootable USB using Terminal. Here’s how:
1. Connect your USB to your Mac, and open Disk Utility on your Mac.
2. Select the drive from the left-hand pane and click on the Erase tab.
Note: This step will erase all data on the USB/drive, so be sure to backup any valuable data you have on your drive.
3. Select “Mac OS Extended (Journaled)” from the Format menu, enter “Untitled” in the Name field and click on “Erase”.

4. Make sure your Yosemite install file is located in the main Applications folder (/Applications) before proceeding.
Open Terminal on your OS X system using Spotlight or by navigating to “Applications -> Utilities.”
5. Copy and paste the following command into Terminal and press Enter.
sudo /Applications/Install OS X Yosemite.app/Contents/Resources/createinstallmedia --volume |

6. When prompted, enter in your admin password and press Enter.

7. Terminal will now start creating the bootable drive and will display the progress as shown below:

The entire process will be complete when you see “Done.”

You now have a bootable Yosemite drive which you can use to install Yosemite on other systems. You can also use this bootable drive to do a fresh, clean installation of Yosemite.
Republished with permission from MakeTechEasier. Read the original.