Origami: The Art of Paper-Folding

There are few things as fascinating as watching someone take a small piece of paper and transform it into a three-dimensional representation of an animal or some type of object.
Origami: The Art of Paper-Folding
The materials you will need (Barbara Gay/The Epoch Times)
12/11/2008
Updated:
12/11/2008
<a href="https://www.theepochtimes.com/assets/uploads/2015/07/almostfinished_medium.jpg"><img src="https://www.theepochtimes.com/assets/uploads/2015/07/almostfinished_medium.jpg" alt="Almost finished (Barbara Gay/The Epoch Times)" title="Almost finished (Barbara Gay/The Epoch Times)" width="320" class="size-medium wp-image-76574"/></a>
Almost finished (Barbara Gay/The Epoch Times)
There are few things as fascinating as watching someone take a small piece of paper and transform it into a three-dimensional representation of an animal or some type of object.

Some origami are simple and primitive-looking. Some are more colorful and intricate. And, then there are some that are truly, inarguably genuine works of art.

Like everything else, however, there is a starting point, and rarely does anyone begin as an expert making the most complex pieces—one usually starts with something simple, repetitious, and practical.

My idea actually started with Halloween; I wanted to give out something for treats besides candy. And, although I’ve heard of people giving out everything from money to stickers and toothbrushes, I wanted to give something more “personal.” (I guess I long for those days when people actually made treats for their “trick-or-treaters” instead of buying them, and parents didn’t have to be afraid to let their children eat them!)

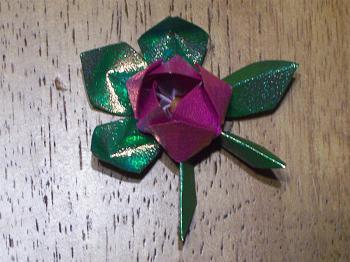
So, I decided to make origami lotus flowers, the kind that Falun Gong practitioners often make to give out to people at public events. I had never tried to make them myself, and I was quite honestly a bit intimidated, but I always felt they were so beautiful—and popular—so, I thought I should at least give it a try and see if I could actually do it.

I made my goal simple: I would just make as many as I could, as best as I could, and give them out as treats for Halloween. So, I arranged to buy some materials and asked for some instruction, and then I began.

<a href="https://www.theepochtimes.com/assets/uploads/2015/07/starts_medium.jpg"><img src="https://www.theepochtimes.com/assets/uploads/2015/07/starts_medium.jpg" alt="The materials you will need (Barbara Gay/The Epoch Times)" title="The materials you will need (Barbara Gay/The Epoch Times)" width="320" class="size-medium wp-image-76575"/></a>
The materials you will need (Barbara Gay/The Epoch Times)

What You Need:

Origami paper (pre-cut is easiest, unless you have a paper cutter)
Small rubber bands (round shaped and very sturdy)
A clean, flat surface to work on
Optional: string, beads, and so on

The size of the paper isn’t terribly important, but it does determine the size of your flowers. So, you’ll need to adjust the paper size if you want smaller, or bigger, flowers. But, I think you will need to use the same shape, which is rectangular.

Color is optional, but the flowers will be something to be proud of if you can make them out of appropriately colored paper. Foil-type paper is the best-looking, but may be hard to find and more expensive.

I checked some local hobby stores, and they usually just have packages of colored paper. If you want to buy a certain amount of a particular color or colors, or something fancier, you might try online or art specialty stores.

To Get Started:

Wash and dry your hands thoroughly.

Make sure your work area is very clean.

Lay out your materials so that you can reach them easily and comfortably from your seat.

For each lotus flower (simple version) you need six pieces of origami paper: Three will be the leaves and three will be the petals of the flower (I use 1 1/2 inches by 2 3/4 inches)

Fold each paper in half lengthwise, with the colored portion out (for paper with only one side colored), making sure that this center fold line is very straight and as “crisp” as possible

<a href="https://www.theepochtimes.com/assets/uploads/2015/07/ontop_medium.jpg"><img src="https://www.theepochtimes.com/assets/uploads/2015/07/ontop_medium.jpg" alt="Lay the leaves on the petals  (Barbara Gay/The Epoch Times)" title="Lay the leaves on the petals  (Barbara Gay/The Epoch Times)" width="320" class="size-medium wp-image-76576"/></a>
Lay the leaves on the petals  (Barbara Gay/The Epoch Times)

Fold each corner of each paper in towards this center fold line, lining up the edges on that fold line, which will make each end of each paper shaped like a triangle (see photos)

Fold each side in, just to the center fold line

Laying one leaf and one petal on top of each other—flat (unfolded) sides together—fold both pieces together with the petal over the leaf (leaf is inside petal)

<a href="https://www.theepochtimes.com/assets/uploads/2015/07/leavepetal_medium.jpg"><img src="https://www.theepochtimes.com/assets/uploads/2015/07/leavepetal_medium.jpg" alt="Bundle the leaves and petals. (Barbara Gay/The Epoch Times)" title="Bundle the leaves and petals. (Barbara Gay/The Epoch Times)" width="320" class="size-medium wp-image-76577"/></a>
Bundle the leaves and petals. (Barbara Gay/The Epoch Times)

Set aside and do the other two the same way, then use a rubber band to hold them all together (side by side)

Once they are tightly bound, pull out the pairs evenly around, and then gently, but firmly begin to unfold the flower petals (leave the leaves folded)

Unfold every other petal, going around the entire flower until all petals are open. Pull petals towards the center and straighten them out, as you open them, shaping them until you are satisfied with the results

Once the petals are completely opened, open the leaves and bend them up in the center

You can now tie a string to hang and add beads. Important: Do Not Be Discouraged By Your First Results!

Keep trying until you’ve made several and then decide if you can see improvement—either in your form or in your ability or in the time it takes you to complete one flower. If you see any improvement at all, don’t quit! You may just need practice.

Make sure to fold each fold very carefully and as precisely as you can; this will ensure your end result is as neat and evenly proportioned as possible. Take your time, especially when you are learning. You’ll naturally get faster as you practice, but if you’re sloppy in the beginning, your flowers will not look neat, which may discourage you from continuing long enough to actually improve.

Also, you might want to try other types of origami—there are many books out there, either at your local library, book store, or hobby store.

If you want to get more intricate, you can add another layer to the lotus by adding two more pieces (possibly of another, contrasting petal color) to the inside and outside pairs of the flower—before you put on the rubber band. These two pieces will be folded over the first petal colors, in the same orientation, as well.

Please let me know if you have trouble with these instructions or if you have any suggestions. Good luck! [email protected]